I got a second wind this evening, plus a brain storm. Yes, it hurt! I actually took another 2 hour nap this afternoon and after dinner couldn’t help but head down to the rubber room. While at CHA, I was so taken with the Tim Holtz Idea-ology Booth — actually, I was mesmerized. There were flowers, grunge board flowers.

CHA Flowers

Ever since I saw them, I knew I had to try my hand at them. I went to Archivers last weekend and they actually had the Grunge Basics. I failed to pick some up in California to bring home. In the dollar bin, they also had a sheet of chipboard flower shapes that I knew I could use as a template. Here’s what I came up with tonight.

Art Journal

The journal is covered with BasicGrey Two Scoops designer paper that I sponged the edges with Vintage Photo Distress Ink. The flowers were cut from Basic Grunge Board. I used some chipboard flowers to trace around and then cut out. The flowers were sponged with Worn Lipstick and then highlighted pad to grunge with Fired Brick. To add some simmer to the flowers, I misted them with Dried Marigold-Gold Shimmer Mist. The leaves were just cut out of the Basic Grunge, sponged with Shabby Shutters, highlighted with Peeled Paint and then misted with Scattered Straw-Gold Shimmer Mist. The bottom grunge piece is from the Elements collection, was sponged with Worn Lipstick, highlighted with Vintage Photo and then misted with the Dried Marigold-Gold Shimmer Mist. The sentiment panel is also BasicGrey Two Scoops. I distressed the bottom layer and then sponged the edges with Vintage Photo. For the top layer, the sentiment was stamped and then the edges were sponged. When I got ready to assemble the layers of the flowers, I placed them how I wanted, and pierced down threw the button into and threw the layers of the Grunge. The ribbon was threaded through a needle and pulled through to tie the layers together with the button.

Stamps: Life Without Art Sentiment from Rubbernecker Stamp Company

Paper: BasicGrey Two Scoops

Ink: Tim Holtz Worn Lipstick, Fired Brick, Peeled Paint, Shabby Shutters and Vintage Photo Distress Inks

Accessories: Tim Holtz Scattered Straw and Dried Marigold Distress Reinkers, Basics and Elements Idea-ology Grunge Board, Distress Tool; Ranger Mini Mister, Gold Perfect Pearls, and Glossy Accents; Tsukineko Sponge Dauber; BasicGrey Two Scoops Button, Pink Ribbon, Piercing Tool

Happy Thursday! I hope everyone has had a good week so far. I’m still a little puny, but feeling better today. I slept most of the day away yesterday and that was probably the best thing I could have done for myself. I do need to get my butt in gear though. I have so many household errands to catch up on and the oldest daughter has a birthday this weekend – mom needs to shop!

I just looked at the clock and it’s Noon. So much for getting my butt in gear! I had such great aspirations today – oh well. I’m sure I’m due another day on the couch cuddled up with the pups and my blanket!

Today’s Ways to Use it Challenge on Splitcoast is to be inspired by music, either by a music-type stamp, a song, a title or a phrase. The possibilities are endless. My first thought was to go put on the iPod, dance around a bit and get inspired. Well, guess what was playing on my iPod this morning? Dixie Chicks – Sin Wagon (one of my favorite songs)! I have been working with a few Rubbernecker images just for fun – looking for ways to add a bit of twisted humor. by doggie, I think I got it!

WT155

I stamped the image of Ethel with the shopping cart (her Sin Wagon), added Murray, and then colored them with Copic Markers. Ethel’s jacket and jewelry are highlighted with a Spica Gold Pen, and I added Ranger Glossy Accents on their eyeglasses for more texture.

WT155 eyeglasses

I didn’t have any designer paper to match the colors, so I made my own. I had the sentiment “Shaken not Stirred,” but needed something to go with it. Using the computer, I generated the first part of the sentiment “I like my men.” I used the new Inkssentials White Opaque Pen for the white dots highlighting the sentiments and the middle panel.

Stamps: Rubbernecker Old Characters Collection 74-01 Ethel with Shopping Cart and 74-07 Murray Rubbing His Head; Rubbernecker Happy Hour Collection 244-09 Martini Background, 244-19 Stylized Shaker and Shaken Not Stirred Sentiment from Rubbernecker Stamp Company

Paper: Neenah Classic Crest Solar White, Purple and Gray Cardstock

Ink: Adirondack Pitch Black and Cool Peri; Tim Holtz Black Soot and Dusty Concord Distress Ink

Accessories: Copic Markers, Spica Gold Pen, Ranger Glossy Accents and Inkssentials White Opaque Pen, Ribbon, Punches, Mounting Tape, Tsukineko Sponge Dauber

All products shown in the photo below (except the Spica Pen) can be found at Rubbernecker Stamp Company.

WT155 Product

Good Wednesday morning! I’ve been feeling a little under the weather this week and have spent most of my days on the couch napping. This morning I actually felt like going downstairs and making a card; however, once I get this post done, I’m heading back to the couch. I loved yesterday’s colors for the Splitcoast Color Challenge and had to make one more card with them. Today I paired them with the Sketch Challenge.


Before I show you my card however, I just want to remind you that Rubbernecker is still seeking demonstrators to help at shows. I added some new days yesterday, and if you are interested, please check out the Show Date page.


Now for my card – I’m starting to wane. The purpose of the Sketch Challenge today was to not only follow the sketch, but there is a cut out at the bottom. The cut out is the important element to incorporate. I need a thank you card, and while I was thinking on the sketch this morning, my mind went to the Lizzie Anne Far East. Love the lotus flower and knew it would make a perfect cut out.


SC165


I stamped in the flower in River Rock and then the design was over stamped in Black. The flower was cut out and then layered with black cardstock that I cut out again. The white background panel was stamped with the tree branch from the set, off stamping once before I stamped on the white. The middle River Rock panel was stamped with the different flower blossoms from the set tone on tone. For the main image panel, I stamped the bamboo branch twice in River Rock and then over stamped once in Black. The sentiment was set to the side and stamped in black. Now, don’t you just hate it when you get everything stamped, assembled and you’re cutting the last panel and put your fingers in still wet ink? I do!! I even heat set the darn sentiment and still miss a small corner and got my fingers in it. If I felt better, I would have redone it!


Stamps: Far East by Lizzie Anne Designs

Paper: SU Whisper White, River Rock and Basic Black

Ink: Adirondack Pitch Black and SU River Rock

Accessories: Ribbon, Piercing Tool, Tsukineko Sponge Dauber, Mounting Tape

AND here’s the product photo!

SC165 Product

Ahoy ye mateys! It’s TREASURE HUNT TUESDAY @ RUBBERNECKER. The Treasure if you find it, will be a free image. However, to receive the Treasure a purchase of any size is required, and your treasure must be claimed between 4:00 am PST until 9:00 pm PST today (7:00 am EST – 12:00 am EST). Not only is today Treasure Hunt Day, but for every $50 in stamps purchased, you will receive one FREE stamp, and don’t forget about the Rubbernecker Bucks Drawing. You can check out more information on the Rubbernecker Home Page.

There are five opportunities today to win some Rubbernecker Bucks. You definitely want to check out:

Candy Williams – Candy’s Land

Kittie Kraft – Kittie Caracciolo

Splashes of Watercolor – Broni Holcombe

Stamp Owl – Frances Byrne

Stamp Talk with Tosh – Tosha Leyendekker

Your first Treasure Hunt Clue today can be found on Frances’ blog. Check it out, I surely don’t want to make you I’d rather give you a

While visiting the Tim Holtz Idea-ology booth at CHA, I took a few pictures of items that struck my fancy. As I was going through my photos and moving some things around, one card in particular caught my eye.

ER Inspiration Card

Using this card as inspiration, and having some extra time, I decided to create. While working on my card, I decided midway through that it would be a perfect opportunity to walk you through the Embossing Resist Technique. I know there are many tutorials on this technique, and I don’t really remember where I first saw it. It very well could have been a challenge on Splitcoast. Beate has written a wonderful tutorial for Splitcoast and after reviewing it, I realize that I have thrown in a little twist, so I will go ahead and show you.

Before I show you my card, there is a story I would like to tell about the image I have used. When my girls were small, they often awoke during the night from bad dreams. I myself had the occasional nightmare, albeit probably not as scary as those of a small child. One day while discussing the sleepless nights with a fellow Girl Scout Leader, she suggested a dream catcher. I was somewhat familiar with them, having seen them in shops and at craft fairs, but never fully understood the reasoning for them. I did a little research, and this is what I found:

Dream Catchers are an ancient spiritual tool used to help assure good dreams to those that sleep under them. A dream catcher is usually placed over a place you would sleep where the morning light can hit it. As you sleep all dreams from the spirit world have to pass through the dream catcher. Only good dreams can pass through the hole in the center while the bad dreams are caught in the webbing and are destroyed by the morning light.

In an attempt to keep my girls from having nightmares, a dream catcher was hung over their beds as well as mine. Mallory was actually the recipient of a very special Dream Catcher made by a Native American that we had met at a craft fair. It still hangs in her bedroom. The Dream Catchers helped both my girls and I can’t remember getting up with them during the night because of nightmares after they were placed above their beds. As for me, I can honestly say that I have not had a nightmare and/or bad dream since placing my Dream Catcher in my room. I’ve never removed the one from my room and it has hung there for close to 15 years now. I forget it’s there most of the time and only notice it on rare occasions.

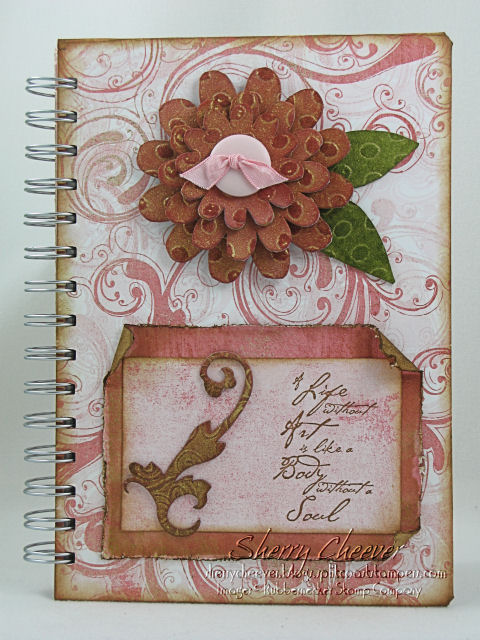
Now for my card. I knew I had the sentiment Dream and wanted to use it. The first thing that popped into my mind (more like association I think) was a Dream Catcher. As luck would have it, I also have assorted Southwest Images from Rubbernecker Stamp Company and a Dream Catcher is one of them.

Dream Card

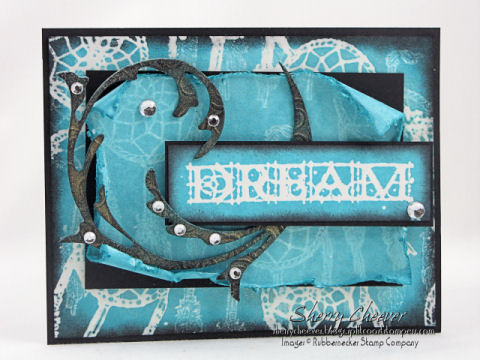
All three blue panels were made with Emboss Resist and then layered on black cardstock. The bottom two layers were sprayed with Shimmer Mist using a combination of Broken China Distress Ink and Gold Perfect Pearls. The Grunge Board accent was first sponged with Broken China Distress Ink and then using Black Soot Distress Ink, I wiped the pad directly across the Grunge to highlight the swirls in the Grunge. For additional highlights, I sprayed the same Shimmer Mist on the Grunge and set it aside to dry.

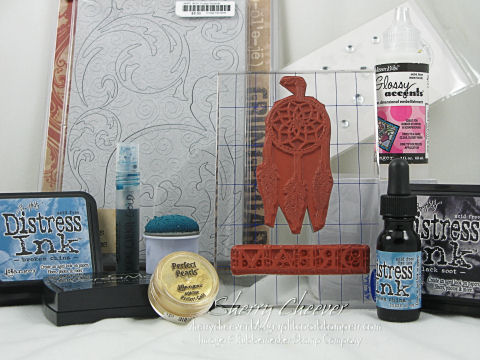
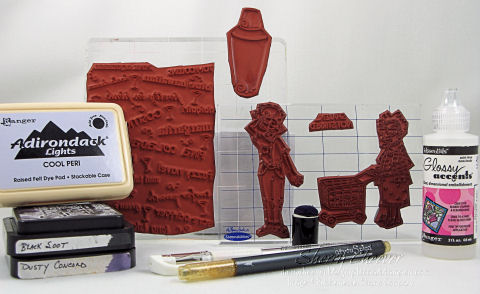
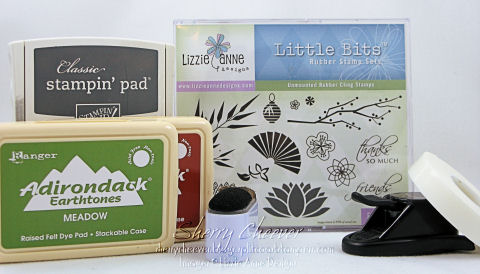
For the bottom panel, I combined various Embossing Resist Techniques. These are the products used for the technique.

Resist Products

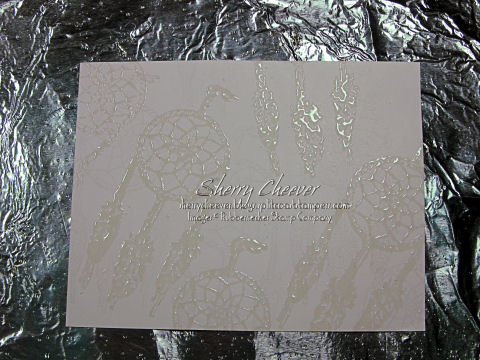
I started by randomly stamping the dream catcher with VersaMark on white cardstock.

VersaMark Image

Using my heat tool, I heat set the VersaMark and then randomly stamped the image again, but this time I covered the VersaMark with Ranger UTEE.

UTEE

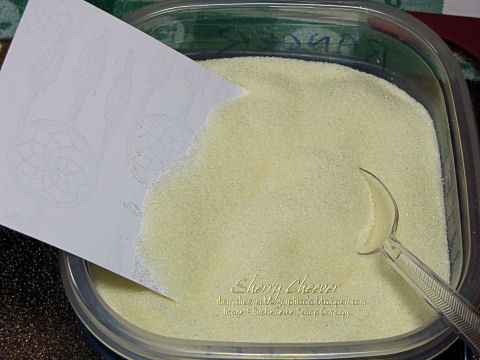
This is how I keep all my embossing powders. It is so easy to pick up a spoonful of embossing powders and shake off the excess back into the container. I also use a piece of cardboard covered in aluminum foil to emboss on. It seems to heat the paper from both sides and speeds up the embossing process. Using my heat tool again, I embossed the UTEE to obtain this result.

Final Embossed Image

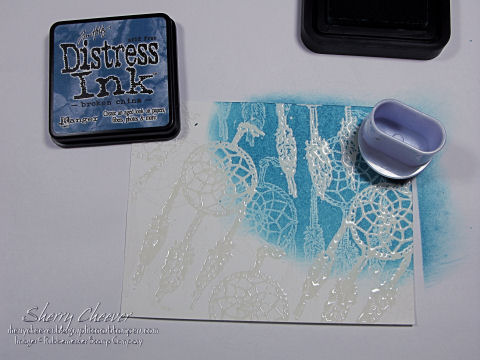
Using a dauber and working in a circular motion, Broken China Distress Ink was sponged over the embossed images. The plain VersaMark images will pick up a hint of the color of the ink and the VersaMark images embossed with UTEE will remain white.

Ink Sponging

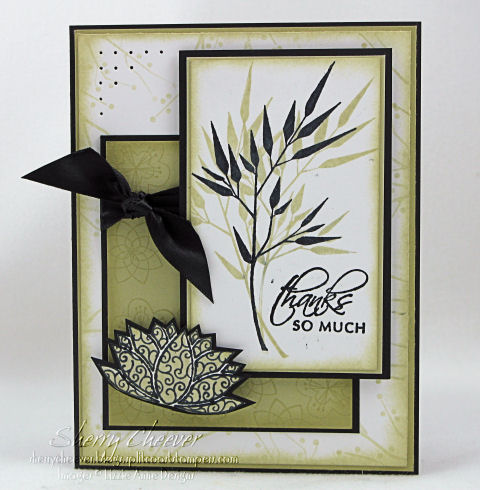
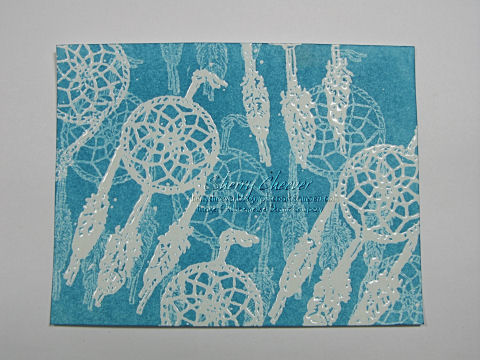
This is my finished background.

BG finished

At this point, I added the Shimmer Mist for some additional depth to the background. As you can see from this photo, because of the embossing the Shimmer Mist will pool on the UTEE.

BG with Shimmer

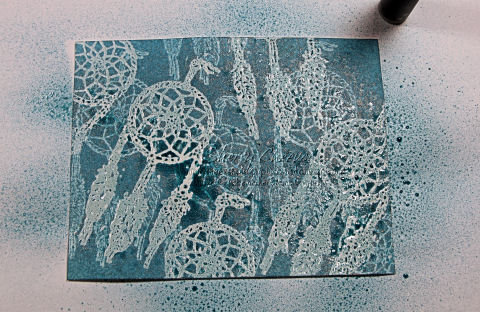
Using a paper towel or rag, gently dab off the excess Shimmer Mist.

Wipe way Shimmer

For the middle layer of my card, I used only the VersaMark Resist. I then distressed the edges with scissors and sponged them with Black Soot Distress Ink. The sentiment panel is made using resist with the UTEE.

The Grunge Board Element was affixed to the card front using Ranger Glossy Accents. The bits of bling are Doodlebug Designs Jewels.

Stamps: Rubbernecker Southwest Collection 288-07 Dream Catcher and Stamp Oasis Sentiments Collection 1681 SO Mystic Dream Text by Rubbernecker Stamp Company

Paper: Neenah Classic Crest Solar White and Basic Black

Ink: VersaMark, Tim Holtz Broken China and Black Soot Distress Ink

Accessories: Ranger UTEE, Mini Mister and Glossy Accents; Tsukineko Sponge Dauber, Tim Holtz Idea-ology Grunge Board and Broken China Distress Reinker; Gold Perfect Pearls; Doodlebug Design Jewels

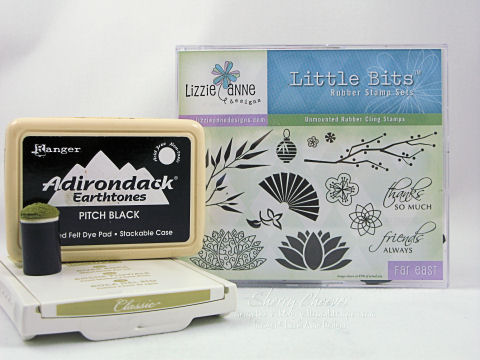
Products shown below, except for the Doodlebug Jewels, can be found on my favorite product page at Rubbernecker Stamp Company.

Card Product

Well, here it is very early Monday morning (or late Sunday night – however you wish to look at it) and I’m not able to sleep. Could it be the I drank up until 11:30 p.m.? Could it be the anticipation that I actually have to set the alarm and get up in the morning? It could be both! It could be the fact that I spent two hours in Archivers yesterday and never took the time to get my purchases out of the bag and now I’m wanting to go into the stamp room and organize. Nope too much work! I’d rather stamp!


I did get out of bed after tossing and turning for about an hour, turned on the computer and immediately went to Splitcoast. I started cruising down through the forums when all of a sudden I noticed that the Try a New Technique Challenge had been posted. WOO HOO how lucky for me! More ways than one actually. I had started working on a card earlier Sunday evening, had it all laid out to finish this morning and guess what? It fits the challenge! I trotted off to the stamp room, stitched up the card, finished it off and I have my challenge card. The challenge today is called I’m All Mixed Up and the purpose is to use mixed designer papers. So anyhoo, here’s my card.


TLC157 Thanks So Much


The background papers I had chosen were Me & My Big Ideas Laguna, a gray sanded finish for the base and the top layer is weathered yellow. Yep, it’s a mixture of designs. I stamped the bamboo branch in Adirondack Meadow and then sponged the edges in SU Basic Gray. The sentiment was over stamped in Adirondack Rust. The image panel was then sewn to a layer of Basic Gray on the sewing machine. The background panels were then sewn to the card front.


Stamps: Far East by Lizzie Anne Designs

Paper: Neenah Classic Crest Solar White, SU Basic Gray, Me & My Big Ideas Laguna

Ink: Adirondack Rust and Meadow, SU Basic Gray

Accessories: Sewing Machine, Corner Rounder Punch, Tsukineko Sponge Dauber, Brads, Ribbon, Mounting Tape

Here’s my photo of the products used.


TLC157 Product


Just a reminder that we are still looking for Demonstrators to help Rubbernecker Stamp Company at some upcoming shows. All the details are in yesterday’s blog post.


EDITED TO ADD: I have set up a page for Rubbernecker Show Dates. All show locations, dates and demonstrators needed are listed on that page. Please check often, new dates will be added and updates on demonstrators will be made there.

© 2015 Suffusion theme by Sayontan Sinha