I hope everyone is enjoying their weekend so far. I meant to make this post earlier this morning, but I got a little sidetracked in the stamp room. I posted back on April 7 about my sister’s birthday. I hadn’t seen her then to give her the present I made, and didn’t want to spoil her surprise by posting it here until she had received it. Not only was this her birthday present, but it was also my Project of the Month for Lizzie Anne Designs. Now that it has been posted on the Lizzie Anne Designs website, and that my sister actually has it in hand, I can finally show you.
I started with 7.5″x5″ Zutter Craft Covers. Both covers were painted front and back with Cermacoat Antique White Acrylic Paint. Once the covers had dried completely, the edges and some of the top finish were sanded with a coarse sanding block. The covers were then painted, inside and out, with Ranger Tim Holtz Scattered Straw Distress Crackle Paint and left to dry overnight. Taking a Shabby Shutters Distress Ink Pad directly to the covers, I wiped the pad across both covers, inside and out, working the distress ink into the cracks of the Crackle Paint. The acrylic paint acts as a resist to the distress ink, and where the finish was sanded lightly, the paint picked up a very light color of the distress ink. The edges of both covers were then sponged with Vintage Photo Distress Ink.
The inside pages of the journal are from a Top Flight 6″x9″ 120 Sheet Ruled Writing Tablet. The pages were trimmed down to 4-3/4″x7-1/4″ to fit inside the journal.
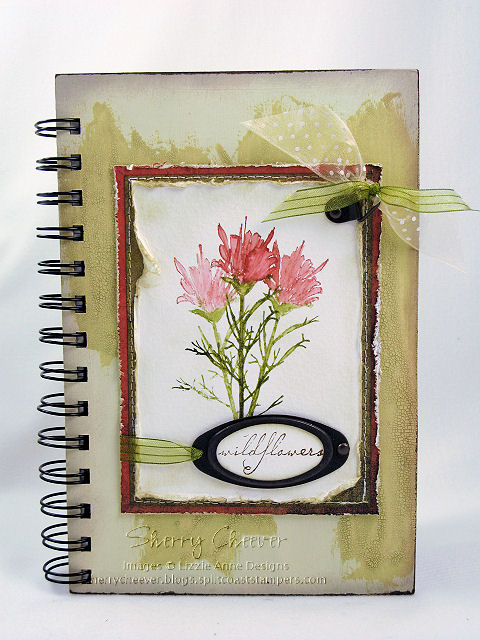
The image was inked with Peeled Paint and Fired Brick Distress Ink, misted with water, and then stamped three consecutive times on 120 lb. Canson Watercolor Paper. While the ink was still wet, a paint brush loaded with water, was used to blend the distress inks. Once the image was dry, the edges were distressed with scissors, and then sponged with Old Paper Distress Ink. The background panels are BasicGrey Infuse. The edges of the bottom panel were distressed with a distressing tool, and the edges were lightly sponged with Old Paper Distress Ink. The edges of the top background layer were sponged with Old Paper Distress Ink, and then both pieces of the designer paper were sewn together on the sewing machine. All three panels were then adjoined together.
The sentiment was stamped in Vintage Photo Distress Ink on Canson 120 lb. Watercolor Paper and punched out using a large oval punch. The edges of the sentiment were sponged with Old Paper Distress Ink, and then placed in the hardware. The hardware was attached to the image panel with a brad and the right and ribbon on the left, wrapped around the panel and taped to the back. An additional piece of hardware was attached to the top right corner and ribbon tied off in bows.
To assemble the journal, the covers and pages were punched with a Zutter Bind-it-All. Using a 3/4″ O wire, the journal was assembled in the appropriate order, and then fastened with the Bind-it-All. The image panel was then affixed to the front of the journal.
Stamps: In the Meadow by Lizzie Anne Designs
Paper: Canson 120 lb. Watercolor Paper; BasicGrey Infuse
Ink: Ranger Tim Holtz Shabby Shutters, Vintage Photo, Peeled Paint, Fired Brick and Old Paper Distress Inks
Accessories: Zutter Bind-it-All, 7.5″ x 5″ Craft Covers, and 3/4″ O Wire Binding; Sewing Machine; Tonic Scissors and Tim Holtz Distressing Tool; Tsukineko Sponge Dauber; Ranger Tim Holtz Scattered Straw Crackle Distress Pint; Cermacoat Antique White Acrylic Paint; Top Flight 6″ x 9″ Ruled Writing Tablet; Sanding Block; Hardware; Brads; Ribbon; Paint Brushes
I hope you enjoy the rest of your weekend, and I’m heading back to the stamp room. Too much to do and so little time!