Good Saturday morning! Now that I’ve had a bit of my morning get up and go, I thought I would do just a quick post. I found that I was in need of a graduation card yesterday and finally got around to making one last night.

My niece’s oldest daughter, so I guess that makes Liz my great-niece, graduated from highschool this year and her party is today! She and Mallory have always been close, especially when they were much younger, and Mallory decided she needed a day out of the sun and is going along with. A day out of the sun? Yep, Mallory is a lifeguard and has been in the sun for three weeks now. She is already a deep golden brown color (much like a biscuit left in the oven too long), but she is also burnt. What we (well me, the mother) didn’t realize that Mallory was still taking meds for her acne and it is one you should stay out of the sun with. Having taken the same medication for years myself, I knew that! Too much exposure is like a hundred tiny needles being stuck in your skin. I truly didn’t realize she was still taking it and she came upstairs the other night and said something about it. She finally read the bottle about sun exposure. I had her stop taking it immediately, since there is no way she can stay out of the sun. By the way, she has already had a save this year and the pool has just been open a week! A little guy from a daycare group was stuck in the middle bobbing up a down, the group around him left and he didn’t. Mallory jumped in
and saved the poor little guy!

Oh my badness, I have totally digressed from the card. Believe it or not, I don’t have one single graduation stamp. It’s hard for me to believe too! So I started rummaging around for something to use, that wasn’t too snarky or too boyish, and decided on the little hippo from SU’s Pun Fun.

Graduation GC Holder

This is actually a gift card holder. I have plans on slipping in money however! The size is 4-1/4″ by 8-1/2″ with scores at 3″ and 2-1/2″ leaving me a card of 5-1/2″ x 4-1/4″. The 2-1/2″ panel was folded up and taped down on the sides to make a pocket to hold the money (or gift card). The hippo was colored with Copic Markers and then cut out using Nestabilities. (I’ve gotten rid of all my Marvy punches now – love these nesties!) By the way, the top flap folds down and is tied in place with the ribbon that wraps around the card.
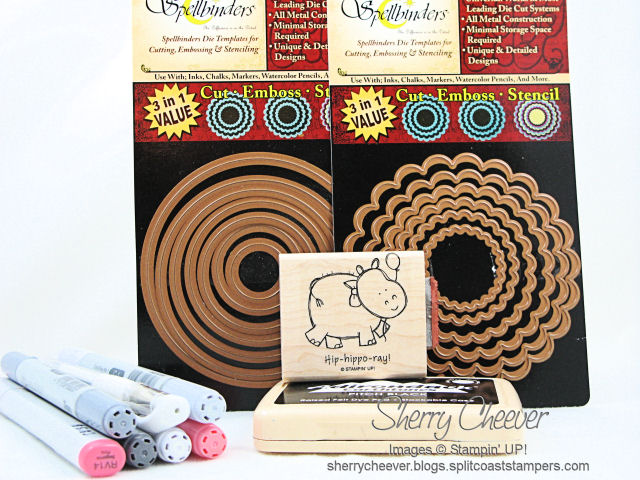
Liz Card PRODUCT

  • Stamps: SU Pun Fun
  • Paper: BasicGrey Two Scoops; SU Pretty in Pink and Basic Gray
  • Ink: Ranger Adirondack Pitch Black
  • Accessories: Ranger Inkssentials White Opaque Pen; Spellbinders Circle Nestabilities; Copic Markers; Fiskars Cloud Edge Scissors; Ribbon

So I hope y’all have a great day and enjoy the start of your weekend!

Good afternoon! I wasn’t going to stamp this morning. I had big plans in the yard. However, as I was cruising online this morning and checked in with the daily challenges at Splitcoaststampers, I saw that the Ways to Use it Challenge was all about packing today. In general, we can use packing/shipping products such as bubble wrap, shipping tags, packing tape or spin the challenge the other way and use a travel theme such as luggage tags, vacation theme stamps etc. I decided to spin the challenge, being the rebel that I am.

When I started downstairs to stamp, I had something in mind for the challenge. Needless to say, once I got started what was supposed to be cute and fun turned into something entirely different. The mojo took over and I was lost in creativity. I know, I know – I’m in a stamping slump or at least I say I am. Anyhoo, bear with me. It will probably take me longer to write this post that it did to make the darn tag.

I think what I’ll do first today, is actually show you the picture of the products used. That way when I mentioned something, you already know what I’m talking about.


WT168 Product


I started with a plain manila shipping tag. The Travel Background was dabbed with the Copper Acrylic Paint Dabber and then stamped on the tag. Cool Peri, Salmon and Juniper were then wiped across the tag. Using a paper towel, the excess ink was wiped off and since the acrylic paint works as a resist, the ink wipes off the acrylic paint. The remaining images were then stamped in black. The rectangle postmarks were stamped on another tag, cut out and inked. They were each distressed in varying degrees, and mounted on the tag using Glossy Accents. The fragment piece was inked on the back using Alcohol Inks and then a postmark stamped on the front. The fragment was also attached with Glossy Accents. I had a 7 Gypsies passport tag in the stash, and cut out pieces of the tag, ink and distressed them. They are both attached to the tag using a brad. The Grunge Board Key was painted and inked and then tied together with a piece of an old earring with black hemp twine and then tied to the tag.


WT168

  • Stamps: Rubbernecker Travel Collection Travel Background SKU:44-08, Hotel Du Palais Paris, and Montreux Palace Luisse; Old World Collection Cote D’ Azur Postmark SKU:193-09, Eiffel Postmark SKU:193-08, Eiffel Tower SKU:193-10, MC Postmark SKU:193-04, Mk Postmark SKU:193-03, Moutier Postmark SKU:193-11, P2 Postmark SKU:193-02, and Paris Postmark SKU:193-07 from Rubbernecker Stamp Company
  • Paper: Manila Shipping Tags, 7 Gypsies 97% Complete Passport Tag
  • Ink: Ranger Adirondack Salmon, Cool Peri, Juniper, Archival Jet Black, Tim Holtz Vintage Photo Distress Ink, and Copper Mixative, Lettuce, Stream and Wild Plum Alcohol Inks
  • Accessories: Ranger Copper Acrylic Paint Dabber and Glossy Accents; Tim Holtz Idea-ology Grunge Board Elements and Fragments; Tonic Tim Holtz Distressing Tool; Tsukineko Sponge Dauber

Well, that’s about it for the day. I need to go out and dig some holes!


NEW SIG

There was an accident yesterday in Jeffersonville. It was a horrid event which occurred around 3:30 p.m. and caused much distress to Her Royal Badness. I was out working in the yard. I made up my mind a few days ago that I truly needed two starts from this snowball bush in the median strip.

boulevard bush

I planted this bush close to 10 years ago from a start that a friend gave me. We cut the bush down for the first five years or so. The bush as it is now having not been cut down during the winter for four or five years. I can’t really remember. Heck I can’t remember what I did yesterday! Anyhoo, at the same time I planted this bush, I also planted one in the side yard.

bush side yard

This bush we have cut back every winter and kept under control. You can definitely tell the difference in size. The one in the median is absolutely beautiful when it blooms. I particularly love the way headlights hit it at night – it is just stunning in early summer with those big white blooms.

So here is my thinking. I have a spot in the backyard that is in desperate need of help. Since we did the remodel, we haven’t paid much attention to the backyard. This summer it is our goal to get more grass to grow, add some vegetation that we lost in the remodel, and in general make the area aesthetically pleasing. I am going to dig up three starts from the bush in the median. Two for me, and one for a neighbor that has been wanting a start for a couple of years. While out there today, I moved the bush to the side and spotted a huge mass of Naked Ladies. Now I don’t know what you guys call them, but around here, Naked Ladies is the name. I truly don’t know them by any other name. In the spring they are a mass of green leaves that die back, and then in the fall a stalk with a single pink bloom comes up. Okay, I just did a Google Search and this is what I found at Wikipedia: they actually are: Amaryllis is a monotypic (only one species) genus of plant also known as the Belladonna Lily or naked ladies. Well, I did not know they were an Amaryllis. We learn something new every day!

Anyhoo, I decided that these needed to be transplanted too. I had planted two groupings, one on each side the bush. I quite easily got most of the first bunch dug up, and moved around to the other side of the bush. These were actually easier to get too. However, this is when the accident happened, and here is the scene.

accident site

I stood there in dismay, not knowing what I was going to do. I picked up my tools, and pulled my little wagon into the backyard. Speaking of the wagon, this is the very wagon that I got for my first Christmas. This wagon is now 49 years old and in desperate need of a coat of paint and some tender loving care. It does serve the purpose I need it for – pulling gardening utensils and plants around the yard. So now in my backyard I have this wagon loaded down with Naked Ladies.

wagon

And sitting next to it on the ground is the victim.

shovel

My shovel!

My favorite (and one and only) shovel died yesterday. It’s poor little handle just gave out and snapped right in half. It has given me close to 25 years of valuable use. We’ve been together digging holes, breaking up sod, busting through roots and moving dirt and plants from area to another. My husband even informed me last night that this particular shovel was his favorite tool to use while cleaning up after the dogs. Hmmmmmmm, little did I know!

As of the writing of this article, I now am the proud owner of two more shovels. I called my mother to inform her of the accident. You see my dad gave me the shovel when we bought our first house. He had it for years and decided to pass it along to me. I thought there might be another old one up at the river that I could grab so that I could finish my planting today. Luckily, my mother had two in her garage that she was going to get rid of. I know they won’t be the same and I probably won’t like either one of them, but until I can get the handle replaced on my old one, these two outsiders will have to work!

As I leave you today, here are a few photos of things growing in the flower beds right now.

My favorite blue Columbine.

columbine

The Foxglove that Kate gave me for Mother’s Day.

foxglove

And lastly, a basket of New Guinea Impatiens.

impatien

I hope you have a great day, and I’ll be out transplanting some Naked Ladies.

NEW SIG

Happy Wednesday! It seems I got to stamp a little earlier today than I have the rest of the week. Of course, I am waiting for it to warm up a bit before I head outside. We’ve been trying to get our backyard into shape, and there is so much that needs to be done. Since we had a good rain last night, I’m going to try and dig up a portion of a snowball bush and plant it in the backyard. I’m also on a carpenter bee killing spree, and I tore the steps away from the spa yesterday. I need to coat the bottom of those with waterproof and get them back into place. Elliot is absolutely fascinated with these bees and I’m trying to get them before they get her.

Let’s get on with today’s stamping. It’s a simple card for today’s Splitcoast Sketch Challenge.

SC178

The background was stamped with Big Paisley, as well as the pink panel under the sentiment. I used a strip of BasicGrey Sugared for the middle and matched the rest of the paper to that. When the card was finished, the top needed a little something, so I added the ribbon.

SC178 PRODUCT

  • Stamps: Little Bits Say it in Script and Simply Singles Big Paisley from Lizzie Anne Designs
  • Paper: Neenah Classic Crest Solar White; SU Bravo Burgundy and Pretty in Pink; BasicGrey Sugared
  • Ink: VersaMagic Pixie Pink; Ranger Clear Emboss Pad and Archival Jet Black
  • Accessories: Spellbinders Oval and Square Nestabilities; Ribbon; Mounting Tape

I would like to take a minute before I go today, to thank each and every one of you who have read Kate’s Story and made a donation to our 2008 Epilepsy Walk Team, Bug Bug Walkers. Your comments, generosity and thoughtfulness have completely overwhelmed me. I continue to get a little choked up each time I think about it! Actually, it leaves me a loss for words – and here I go again, so it’s time for me to go outside today.

NEW SIG

Good morning! If you haven’t read Jeanne’s blog yet, we’ve made a few changes to our Rubbernecker Blogger Challenges. Starting today, they will be announced on Tuesdays, along with the Treasure Hunt. We thought it might be fun to give you a few alternatives to the RN Weekly Challenge. Feel free to combine it with the SCS Color or Sketch Challenges, and enter as many times as you wish during the month. All deets can be found over at Inky Paws. Today kicks off Rubbernecker Blogger Challenge RBC11 – Paper Piecing.


It’s also TREASURE HUNT TUESDAY! If you are new to the Treasure Hunt, the first clue and all details can be found on the Rubbernecker Home Page. Broni and Kittie are offering Rubbernecker Blog Candy today. Visit both of their blogs and leave a comment for a chance to win a $10 Rubbernecker Gift Certificate.


My card for the Blogger Challenge today is one inspired by a ceramic rooster I saw at Hallmark. I didn’t buy the rooster, but I did make mental note of how funny it was. Here’s my version of the rooster, Chef Cluck!


RBC11


The grill was stamped, masked and then Henry the Rooster was stamped. All images, except the neckerchief, were colored with Copic Markers. To comply with the RN Blogger Challenge, the neckerchief was paper pieced with Western Sky Designer Paper. The hamburgers on the grill are raised with tiny pieces of mounting tape. The edges of the image and all the designer paper were sponged with Vintage Photo Distress Ink. I also sponged the edges of the River Rock paper. The designer paper was sewn to a panel of River Rock, and then mounted on a card base of Blue Bayou. The sentiment, Eat More Beef (hehe – a rooster cooking beef), was generated on the computer.

RBC11 PRODUCT


Stamps: Rubbernecker On the Farm Collection Henry SKU:58-07; and Rubbernecker On the Go Collection Barbeque SKU:75-08 and B B Q accessories SKU:75-25 from Rubbernecker Stamp Company


Paper: Neenah Classic Crest Solar White; SU River Rock, Blue Bayou and Western Sky Designer Paper


Ink:  Ranger Tim Holtz Black Soot and Vintage Photo Distress Inks


Accessories: Copic Markers, Red Spica Pen; Sewing Machine; Tonic Tim Holtz Distress Tool; Tsukineko Sponge Dauber; Brads; Oval Punches; Computer for Sentiment; Mounting Tape


Enjoy the Treasure Hunt and don’t forget to comment for the RN Blog Candy. I’m gonna try and catch up on the stamping I didn’t get done over the weekend.

NEW SIG

© 2015 Suffusion theme by Sayontan Sinha