
Happy Thursday! I want to continue with the Alcohol Faux Bleach/Batik Tutorial today. If you were at the Chicago or York Stamp Show, you saw me work with acrylic fragments and alcohol ink. That is what I want to walk you through today. I’ll also show you the finished project, which is a tag made with alcohol inks using the faux bleach technique. I really think this one needs a different name, but I just haven’t settled on what. I am leaning toward calling it – – – oh I don’t know! It is a variation of the faux bleach technique that I have been playing with so it might as well be Alcohol Faux Bleach.
Let’s get started by inking up your felt applicator with the alcohol inks. I have used cranberry, butterscotch and stream.
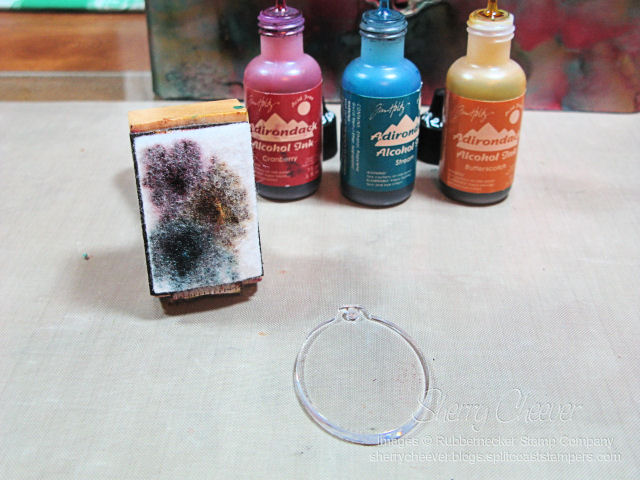
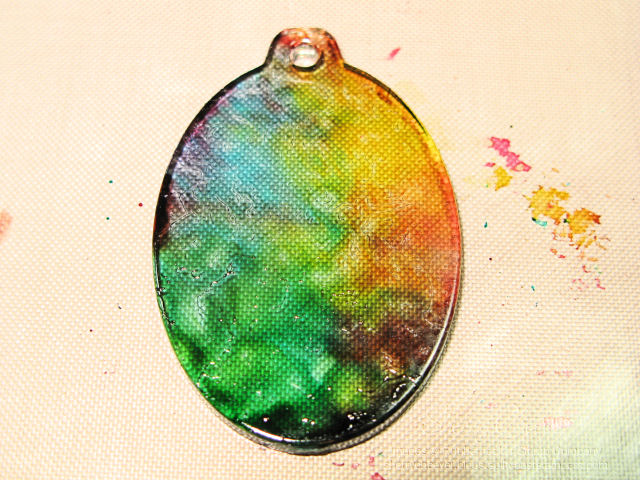
Apply the inks onto the fragment, letting the alcohol ink dry in between layers. You will end up with a fragment that looks similar to this. Let the ink dry thoroughly.
Choose an image (not words or sentiments) that you would like to stamp on your fragment. Ink the image with a permanent black ink. I have used Ranger Archival Jet Black.
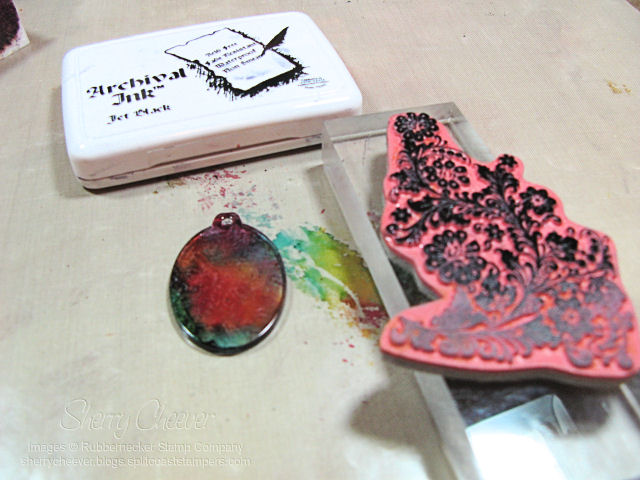
Stamp the image over the alcohol ink that you applied to the fragment.
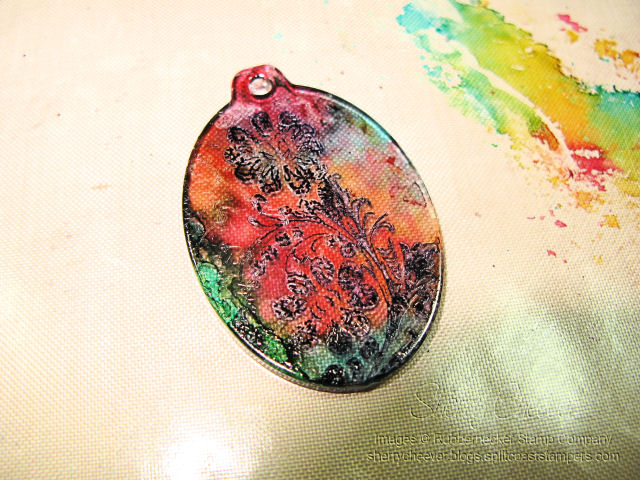
Using a gentle touch, immediately wipe the black ink off with a cloth. You should now have a fragment that has a clear image of the one you stamped.
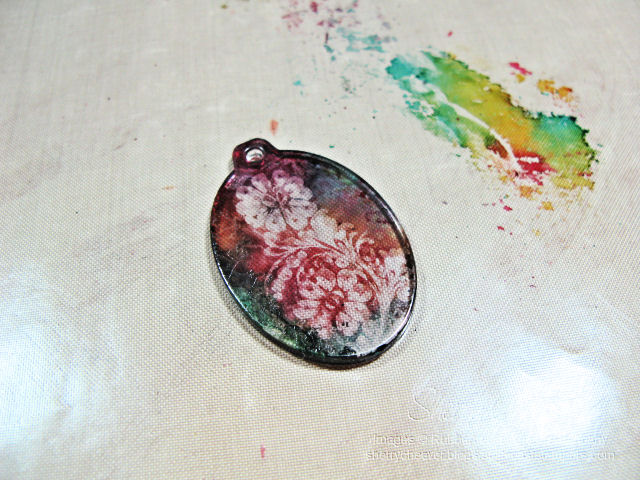
To highlight the stamped image, glue the fragment (alcohol ink side down) onto a white piece of cardstock. I have used Ranger Glossy Accents as my glue. It dries clear and very quickly. (By the way, I applied more Glossy Accents than needed – it was way too much.)
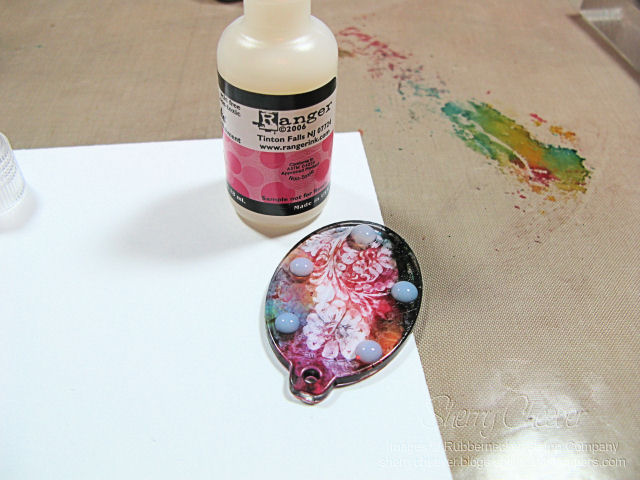
Trim the image and you will now have an embellishment ready to use on a card, or anything else you would like to use it for.

For mine, I used the fragment as an embellishment on a tag. Using the faux bleach/batik technique described in the first installment of this tutorial, I created a tag using alcohol inks. The tag, unlike glossy cardstock, absorbs the alcohol ink and gives an entirely different look than that of glossy cardstock.
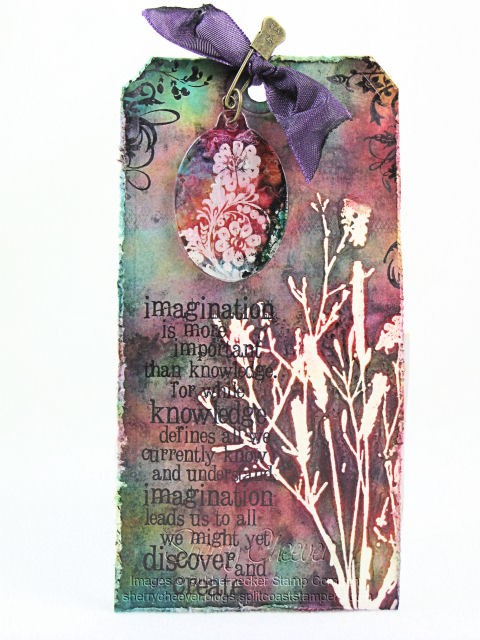
Supplies used:
- Stamps: Tim Holtz Nature’s Discovery by Stampers Anonymous from Rubbernecker Stamp Company
- Paper: White Cardstock and White Shipping Tag
- Ink: Ranger Archival Jet Black and Distress Embossing
- Accessories: Ranger Cranberry, Butterscotch and Stream Alcohol Inks, Ink Blending Tool and Felt, Glossy Accents, Alcohol Blending Solution, Clear Embossing Powder; Tim Holtz Idea-ology Oval Fragment and Trinket Pin; Heat Gun; Iron; Ribbon; Tonic Tim Holtz Distress Tool
I can’t wait to see all of your alcohol ink projects!


This is beautiful Sherry. Thanks for the tutorial. Nice job!
Sherry, the accent looks beautiful on the card. Hope that the local Michael’s sells the fragments; I’m ready to try another new technique 🙂 Hope you enjoyed a super duper birthday and that the weather was as nice as it is here in northern Virginia.
Very cool!
Sherry..this is my favorite thing that you have ever made. This is awesome!! Tim taught you well…lol!!
Love the way this turned out!!
Just a couple of questions though –
when you wipe off the PERMANENT black ink – why does it wipe off if it’s permanent and why doesn’t the alcohol ink around the image wipe off too??? Can you explain or have I misread the directions?
I know isn’t that the coolest? I saw that on Tim Holtz’s blog. You did a great job with yours, it’s so pretty
This is a real jaw dropper. Exquisite. Thank you so much and FYI — I absolutely love shopping at Rubbernecker. Thanks so much for introducing me to this wonderful site.
OMG, Sherry! This is the most beautiful tag I’ve EVER seen!!! I’m drooling on my keyboard!!
Wow, super cool idea! I love it, and I too hope you had a GREAT birthday. 🙂 Kel
Sherry ~ what a stunning piece of art!! Thank you so much for making the time and effort to put together your wonderful Tutorials over the past two days 🙂 I just got through printing them off to insert into my collection of new and innovative items I wish to try. I’ve never seen this technique using Tim’s fragments but plan on attempting it soon. You seriously need to start framing and showcasing your work so everyone can enjoy it, including the pups!
Wow Sherry, this is just beautiful!
Thanks for sharing, your tag is just gorgeous!
This is awesome! I’m working with Dave in the booth this weekend and so hopefully this is one of the demos we will get to do. Love it!
Absolutely gorgeous! Have some alcohol inks but never opened them. Here’s my inspiration. Thanks for sharing.
Thanks so much for this tutorial. This is amazing!!
Super cool, Sherry…thanks for the great tutorial!!! Your tag is AWESOME!!!
Beautiful!!!!! I just picked some fragments up the other day and this seems like a fun technique to try with them.
What an artista Sherry! I love the piece and the tag. Gorgeous art!
Great tutorial ! I was at the stamping convention in York, Pa. last weekend and saw you do this technique. As a matter of fact my daughter-in-law and I sat across from you and had a nice visit while having lunch on Saturday.
I’m just getting to try out this technique. I thought I remembered you spritzing some water on the fragment after stamping the image on it but don’t see that step in the this tutorial. Does it work either way?
Thanks for your help and I hope your soldering is working out.
Karen
Love how this technique turns out. The acrylic fragment turn out gorgeous. I am going to have to try this! Thanks for the Great Technique Sherry!
Great technique, Sherry — love the look!
[…] Alcohol Inks on Tags or Non-Glossy […]
This is SO kewl! I love the colours you chose & the finished look is breathtaking! Hope it’s ok if I link you up? Thanks for the constant inspiration! :O)
Awesome tutorial…thank you so much for sharing..love the samples.
connie
[…] Alcohol Inks and Fragments […]
Great project and wonderful tute! Thanks for sharing. Happy New Year! Hugs, Marie x