Some time back, right after Summer CHA, I started playing around with the Faux Bleach Technique that I had learned in a Tim Holtz class.  You all know that I post quite a few cards with this technique and have started using other mediums besides the Ranger Color Wash.   I was experimenting for a reason.  One, I couldn’t contain myself and had to keep playing, but the main reason was because I was asked by Beate Johns to write a tutorial for Splitcoaststampers.  I wanted the technique to be versatile enough that anyone could try the tutorial even if they didn’t have the Ranger Color Wash.  The links below show some of the other medium that I have used:

Alcohol Inks on Glossy Cardstock

Alcohol Inks on Tags or Non-Glossy

Shimmer Mist on SU Whisper White

I am so excited because today is the day!  My tutorial on Splitcoaststampers goes live today . . .  WOO HOO!  You have to check it out, Faux Bleach, and they have even made a special gallery just for the Faux Bleach technique.  I’ve already started moving in some of my earlier Faux Bleach cards, and can’t wait to see what everyone does with this fun technique.  The best thing . . .  I’ll be able to find the cards all in one place!

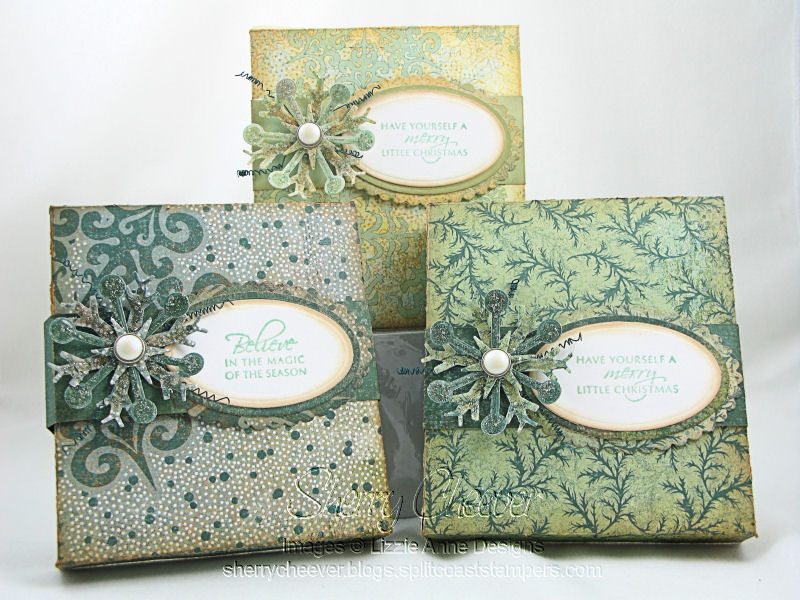
This is the card I made for the tutorial, but I’m not going into the details here.  You’ll have to take a look at the tutorial (I know bad, bad, bad)! BUT, the green background panel is actually one piece.  I die cut the end with Spellbinders Deckle Scalloped Edge Petite Borderabilities, scored 1″ over and folded over the flap.  I die cut a second edge, and then stitched the two together on the sewing machine.
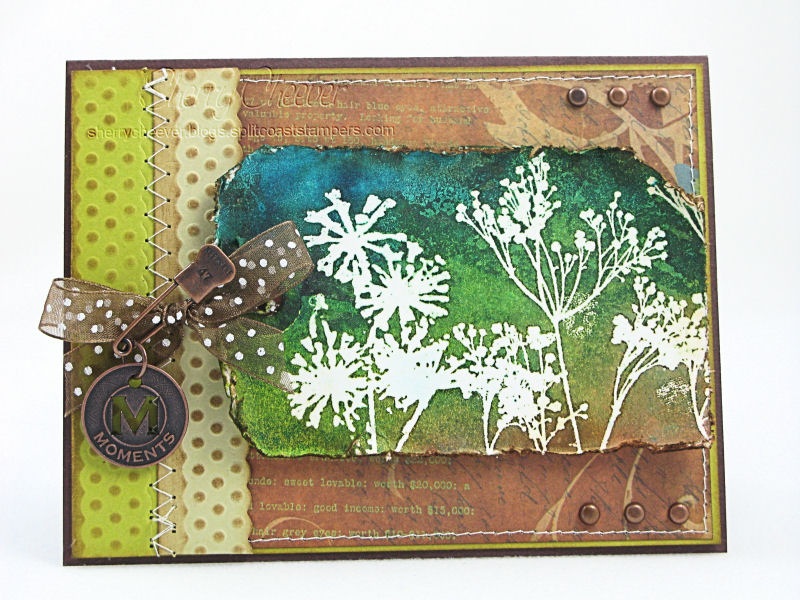
Faux Bleach Tutorial Card

Anyhoo, have a great day today and if you are going out with all the New Years’ Revelers, party heartily but be safe!  I for one will do what I always do for New Years’ Eve . . . curl up on the couch, watch old movies and maybe stay awake long enough to ring in the New Year.

Good Tuesday morning!  Well, we have come to the last Treasure Hunt Tuesday at Rubbernecker.  It’s been fun . . . but all good things must come to an end.  We do however, have some new things in the works that I think you’ll be very excited about.  I know I am!!

To check out all the details of the Treasure Hunt and to see which Designers are participating today, hop on over to the Rubbernecker Stamps Blog.  It is my pleasure to offer up the last Treasure Hunt Blog Candy today.

Bucks

I will be giving away two $10 Gift Certificates to be used at Rubbernecker Stamps.  All you have to do is leave a comment on this post and if you feel energetic, I would love to hear ideas for Friday Focus.  I have to tell you that my brain is just a little fried trying to think of something new each week.

I was feeling in a Valentine mood when I made my card for today.  I’ve had this image it seems like forever, but have never put ink to it.  The more I looked at it, the more I realized how cute it would be for a Valentine.

SO Make A Wish

But notice the sentiment on the outside, Wishing you.  Now on the inside it could be anything at all.  Wishing you . . . would be my Valentine, a Happy Birthday, a Speedy Recovery, would fall down the well, would leave me alone . . . Needless to say, the possibilities are endless!

  • Stamps: Wishing you Well Sentiment from High Hopes Rubber Stamps; Stamp Oasis Little Lovin’s Collection: Make A Wish SKU:1054 SO and Rubbernecker Easter Collection: Dot Square SKU:84-02 from Rubbernecker Stamp Company
  • Paper: Neenah Classic Crest Solar White; SU Riding Hood Red
  • Ink: Memento Tuxedo Black and Ranger Archival Jet Black
  • Accessories: Copic Markers; Venture Foam Tape; Ranger Glossy Accents; Tsukineko Sponge Dauber; SU Scallop, Word Window and Photo Corner Punches; Brads; Ribbon

Don’t forget to leave a comment for the Rubbernecker Gift Certificates and I hope you have a great day!

Happy Monday!  As I sit here once again, dreading the walk down the stairs to the studio, it occurred to me that I have absolutely no stamping to share.  I’ve spent the better part of the last 5 days sitting on the couch watching old movies and surfing the internet.  I know that I will be paying for this slacking pleasure when my deadlines are looming and I’m not ready.  Yes, I need to get off my fanny and take the plunge but there are other things on my mind and I’m drawing a creative block.

One thing I’ve been thinking about is a new camera.  I so want a digital SLR, and can’t decide on which one.  I have always been a Canon user, ever since we bought our first AE1 Program back in the early 80’s.  I still have that camera and my daughters both used it during high school photography classes.  The sad thing is that film cameras are a thing of the past and I’ve never taken the time to look at new ones that weren’t point and shoot.  Yes, I have a fabulous Canon G7, 10 megapixels, that is easy to carry and does all that I want.  However, I have an itch . . . an itch for a new Canon SLR that is more than 10 megapixels.  Here’s my reasoning  . . . why should I buy another camera that is anything less than what I have now.  If there is anyone out there that has purchased camera equipment online, I would love to hear all about it.  What site?  Who has the best prices that can be trusted?  We all know that we can get better deals online that going to the local Best Buys or Circuit City.  I’ve been surfing the internet looking at all the sites, prices, etc., and now I am so totally confused that I am beginning to doubt myself.  So, I need some help.  Tell me what you know!

In the meantime, I have been following the photography challenges on Splitcoaststampers.  This is a fairly new challenge, started by Angie Zublionis, and she always has some interesting photos to go along with her challenges.  I have to admit that I’ve been lurking in this forum since Angie told me about the challenges back in the fall.

I couldn’t resist any longer, and decided to participate in this week’s challenge.  The challenge is to find reflections on anything.  Of course, I staged mine since we have no snow, ice or anything shimmery right now.  However, I will be out walking around with camera in hand looking for that perfect reflection.

PC15 Reflections

This is a fairy doll that my mother gave one the girls as a Christmas decoration over the weekend.  I sat her on my dresser to achieve the reflection in the mirror.  Why do I like this photo?  I love the depth of field achieved by having the camera on macro blurring the actual doll, but giving me a detailed reflection.

So much for more rambling today . . . have a good one!

Happy Friday!  I hope you all had a wonderful Christmas.  We had Christmas Eve here with my family and lots of food.  Once again we over did it with the food . . . but oh my was it good!

As I’ve mentioned in prior posts, I had made some gifts for my sister, aunt and mother that I couldn’t show until after they had received them.  Today, I get to show you!  You have to bear with me though, there’s a lot of info to share.

These are the notebooks that I made for them.  Each one has their initial that was covered in Ranger Glossy Accents and then sprinkled with glitter.  Once the first layer had dried, the initials were covered again with another layer of Glossy Accents.  I love how it made the initial thicker and more durable when the books are handled.

RN Monogram Notebooks

I used heavy weight chipboard coasters for the covers, painting them black with acrylic paint.  The inside pages were made from loose leaf paper that was cut to size, and then all was bound with 5/8″ O wire binding and the Bind-it-All.  For the front panels, I used Spellbinders Labels One Nestabilities and layered them all, with the monogram raised with foam tape.  The background was made by stamping my image on white paper, clear embossing and then inking in Black Soot Distress Ink.  After I had the black color I wanted, I ironed off the embossing using the Faux Bleach Technique (you’ll see more on this later).

I needed something to wrap the notebooks in, so I decided to make my own boxes using Jen del Muro‘s mini pizza box template.  Of course, I needed to make the box larger so I added 1″ to the dimensions.

LAD Snowflake Gift Boxes

I made a band from the coordinating cardstock and put velcro on the bottom to make removal easy.  I made the snowflakes from the same paper, die cutting them with Spellbinders Snowflake Wonder Shapeabilities.  I covered each snowflake with Ranger Glossy Accents and sprinkled each with glitter.  The layers were put on a pearl brad, and to hold the wire embellishments in place, I wrapped the wire around the brad before I flattened the prongs out.    The snowflakes and sentiments were put on labels made with Spellbinders Petite Oval Nestabilities.

Oh and by the way, here’s a closeup of the monogram,

Close up of Monogram notebook

and of the gift box.

Gift Box Close up

I hope you all have a great day!

I’ll be spending time with family over the Holidays but wanted to wish everyone a very Merry Christmas and

Millan.net

© 2015 Suffusion theme by Sayontan Sinha