Millan.net I hope y’all are ready for all the little Smiley from millan.net I’ve got the Snickers and M&Ms in the basket by the front door and ready to have a Smiley from millan.net good time!

Remember when I told you that I had some ideas for projects that I needed to put ink to?  Well, today’s project is one of those.

I love projects that you get totally lost in and feel like you accomplished something when you are finished and hat’s how I feel with this project.  I went into the studio yesterday morning and it was 9:30 last night when I looked up and realized I had spent in the entire day working on this project!  Of course, there were some trial and error things that happened, but you know what?  I didn’t even care . . . . I simply tossed them aside and started over!  It was too much fun!!!

I first started with a 5×7 stretched canvas that I covered with gesso . . . . uh it’s on the floor somewhere!  Not being daunted by it, I then reached for a flat 5×7 canvas (no gesso this time).

CanvasCloseUp

What’s fun about this canvas is I actually tried the Wrinkle Free Distress Technique on it.  It worked, but I didn’t get the end results that I truly wanted so I ended up misting the canvas with Gold Perfect Pearls and water and then the ink float more across the canvas.  I was after a softer look.

I also need to tell you that the canvas itself was the last thing I worked on.  I made all the different elements first, deciding on the colors and style and putting them all together.  It was after all the little things were done, that I actually inked up the canvas.

Sadly the photo above doesn’t show it . . . the wings are covered in gesso that I textured in a feathery motion to actually look like wings.

SheOnlyFlewOct31

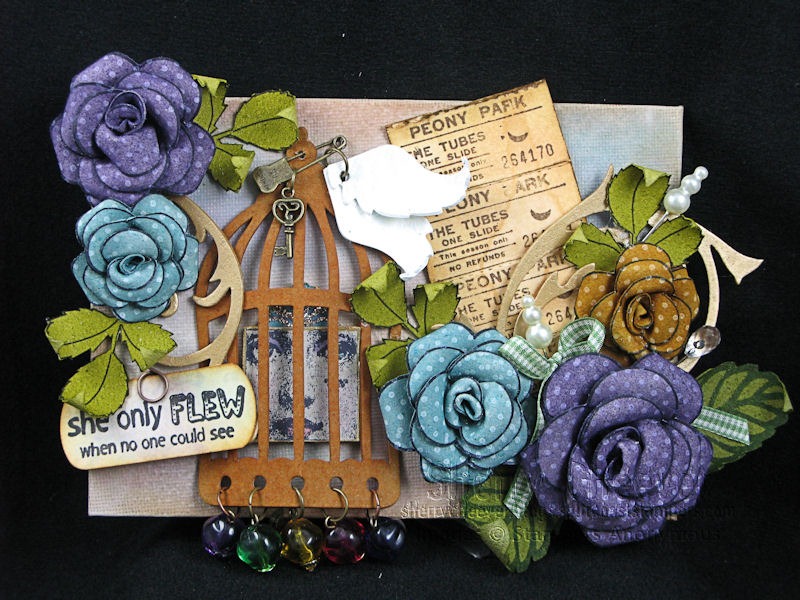
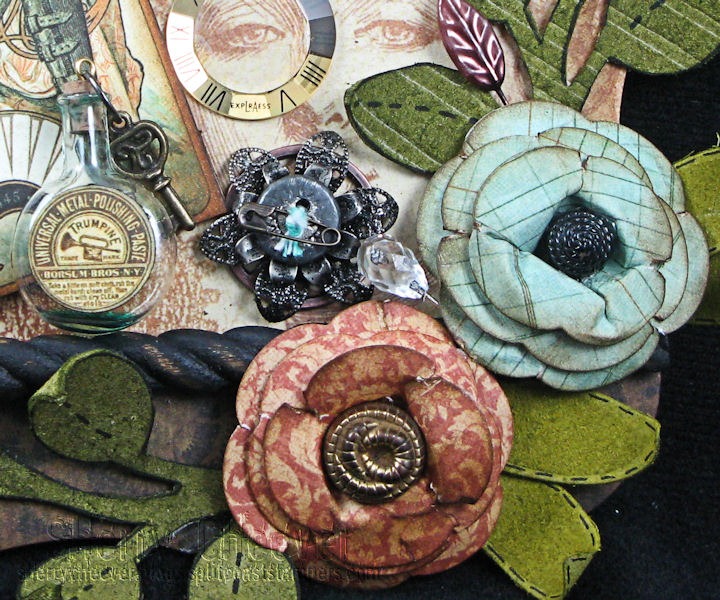
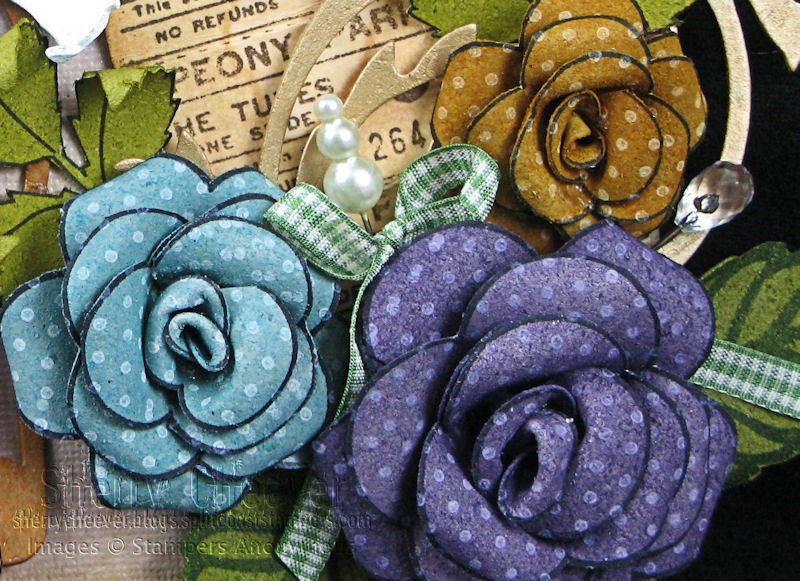
I love these roses.  I stamped the rose image out on GrungePaper first and then over stamped the polka dots in Snow Cap pigment ink.  I let the white dry and then cut out the individual pieces before deciding what color the roses would actually be.

RoseCloseUp

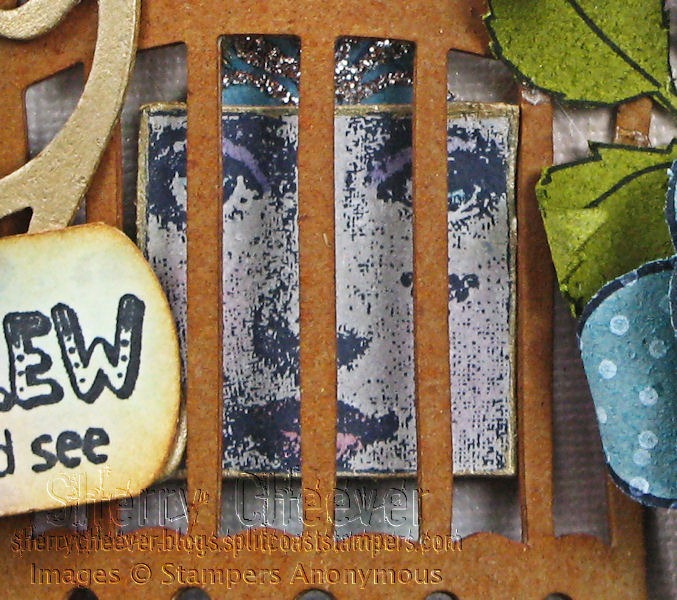
The bird cage is arched over the face and fastened down on either side with 1/8” Score Tape.  Boy it really holds things down!  I actually used it on a number of items on the canvas.  There’s a 1-1/2” piece under the face, holding it down behind the bird cage.

FaceCloseUp

Speaking of which . . . the face.  I actually covered a small piece of GrungeBoard with Snow Cap pigment ink before I stamped the image.  It was then cut out and water colored with Distress Re-Inkers to add some color, lipstick and eye shadow.  The white ink softened the gray color of the GrungeBoard and then let me add some more fleshy tones (like tea dye) for the skin.  She even has a tiara one . . . can you see it?

The beads on the bottom of the bird cage are from an old pair of earrings that I had in my stash.  Thank goodness for family and friends that pass along old jewelry they no longer wear or want!

For added humor, I stuck in tickets for The Tubes.  I think of a water slide when I think of the tubes, and water better way to fly (well maybe first class)!

Stamps: Studio 490 – Dimensional Rose Art, Rose Art Part 2, It’s Face Art, and Seriously Art by Stampers Anonymous from eclectic Paperie

Ink/Paint: Ranger Tattered Rose, Worn Lipstick, Fired Brick, Crushed Olive, Peeled Paint, Dusty Concord, Tumbled Glass, Broken China, Wild Honey, Antique Linen, Rusty Hinge, Tea Dye, Vintage Photo and Old Paper Distress Inks; Ranger Snow Cap Pigment and Olive, Coffee and Jet Black Archival Inks; Ranger Gold and Snow Cap Acrylic Paint Dabber

Accessories: 5×7 Flat Canvas; Tim Holtz Alterations Caged Bird and Elegant Flourishes; Ranger Claudine Hellmuth Gesso, Rock Candy Distress Stickles, Tiara Glitz Stickles, Mini Mister, Ink Blending Tools with foam, Gold Perfect Pearls, Matte Accents; Maya Road Trinket Pins; Tim Holtz idea-ology Trinket Pin, Jump Rings, Memo Pin; Manila Shipping Tags; Miniature Key; Old Jewelry; Score Tape

Well, I guess that’s all I’ve got for you, except I’m so damned thrilled with myself that I finally got this project down in ink!  Smiley from millan.net

There’s not much more to say, except thanks for stopping by today and I’m Smiley from millan.net

SHERRY SIGNATURE

Happy Tuesday!  I have a personal project to share with you today.  I didn’t really plan on making this, but  . . . well, I just couldn’t resist.

Tonight is social night at Sorority and since I am hosting in October, my sorority sister and I decided to go with a Witch Hat theme.  Of course, we all all sorts of devilish delights . . . potato soup, chili, pumpkin cake, wine . . . . and it is mandatory that all our sisters wear witch hats.

Saturday night is the annual Witches and Bitches Burn hosted by my friend Bad Bev and her sister, Terri.  It’s been a few years since I’ve been able to attend for one reason or another  . . . for the last couple of years I have been out of town working stamp shows . . . but I’m definitely planning on taking my BAD self, along with some Shark Fin, to the burn.  Once again, a witch hat is mandatory!

Now I’m not real fond of spending an entire evening sitting around in a witch hat.  First off, the brim gets in my way and I inevitably catch myself on something.  I did find my hats yesterday and quite frankly, I hate them both . . .  SO, I decided to make myself a new one that better expressed who I am!

Yesterday on my way back from physical therapy (wrist), I stopped at the store to pick up the drinks and deserts for tonight’s gathering, and I found a tan ball cap on clearance for $2.00.  Okay for $2.00, I could afford to buy it and alter it without really caring if I messed up the hat.  Honestly . . . . . I LOVE MY WITCHING HOUR HAT!

HAT

I airbrushed some different masks using Black Copic with the airbrush, then added some additional purple and green color just by spraying around for the fun of it.  I particularly wanted the clock in the front . . . thus, the Witching Hour.  I added some game spinners as clock hands and pushed them through the bill with a long fastener.  The flowers are made from GrungeBoard covered in Graphic45 Halloween in Wonderland.  I die cut the GrungeBoard using the Tattered Florals die.

HAT Flowers

I decided the other side of the hat needed a little something, so I found my Memory Glass and Frames and cut out one of the Alice images from the paper.  The sentiment inside the frame came from going through various old books.

HAT Witch

I plan on wearing this hat tonight, as well as to the Witches and Bitches Burn.  I’ll be the bitch who refuses to wear a proper witch hat!

Thanks for stopping by and remember . . .  life is short, take advantage of the adventures that come your way!  Even if it is does mean being a bitch once in a while.

SHERRY SIGNATURE

Good Sunday morning!  I hope everyone has had a fab weekend so far.  I was finally able to get my long 4 inch locks cut yesterday  . . . . woo hoo . . . and don’t have to gunk it all up with product now.  Amazing how much I got used to having no hair and the natural look . . .  it’s just way to easy to take care of!

After I came home from mom’s, where we all get haircuts together . . . yes, we have a family friend come in and do a salon day with us . . . I headed straight to the studio with ideas brewing!

First, let me tell you this.  When I first saw the new Spellbinders™ Grand Nestabilities® at CHA my wheels started turning.  Surely you can guess where this is going, right?  I immediately saw wall hangings made from GrungePaper and guess what  . . . it works!

I cut my own backing from GrungePaper for this wall hanging

SteampunkArtOct24Main

Yes, I surely did!  I am so excited to have different shapes now that will work for wall hangings . . . way too much fun.  Anyhoo, there is much to talk about and to look at here.  First that hanging itself.  The back is GrungePaper and then I die cut the Graphic45 Designer Paper to fit the Nestie.  I had some wood rope trim that I cut down to size and painted black to separate the two papers (flip side of the top).  While we are talking about the paper on the top, check out the lady in the background on the right.  I point this out because I had already picked the sentiment I was going to use for this project, this inchie from Artful Illusions,

SteampunkArtOct24Sentiment

stamped on a piece of GrungePaper, sponged with Broken China and then, using on of Tim Holtz’ mini masks, sponged on Vintage Photo.  As you can see, it was attached to the project with a Memo Pin.

The image on the left was added for some color.  It was mounted on illustration board and then attached to the backing with small hinges.  The hinges were really gold and bright, so I tapped them into some embossing ink and then embossed with Black Soot Distress Stickles.  I did the same for the metal flower on the bottom.  I couldn’t resist adding a watch facet from on old watch to the lady’s eye . . . . oh yeah, too much fun!

The flowers were die cut with the Blossom Nesties, and then curled and glued together. Vintage buttons were added to the center of them.  Everywhere I saw open space something else was tucked in . . . like the trinket pins.

SteampunkArtOct24Corner

I think that’s all I have to tell you about the project.  Just keep looking for little things added here and there.

Thanks for stopping by today and remember . . . . life is short, make the most of the adventures that come your way!

SHERRY SIGNATURE

Happy Saturday!  I thought I would try and get one more Halloween card done before I started into Christmas, so last night I spent a few hours in the studio.  Well, in between needing to be upstairs some and after dinner at Kate’s.

SpookyTimeOct23

All the images are from Crafty Secrets and the background paper is from Graphic45.  I decided to mount the game on illustration board and cut frames using Spellbinders Nestabilities.  Inside I stamped Happy Halloween.  I guess I better be getting some of these cards ready and in the mail soon!  I’m so bad about that.

Thanks for stopping by and I hope you have a fabulous weekend!

SHERRY SIGNATURE

© 2015 Suffusion theme by Sayontan Sinha