
Good morning and welcome to Day 7 of the Spellbinders™ Sneak Peek and Giveaway! I hope you’ve enjoyed the sneak peek so far and you’ve found some wonderful inspiration over the last 6 days. I know I sure have!
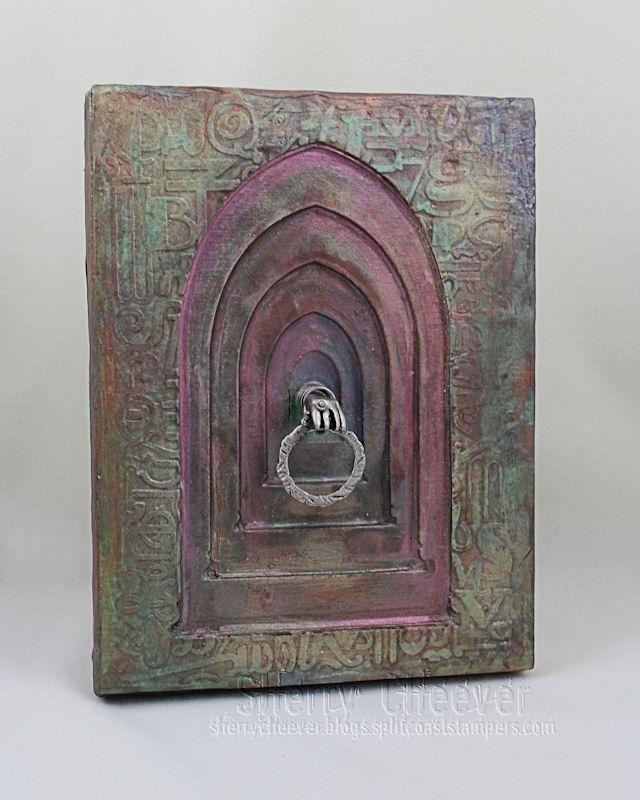
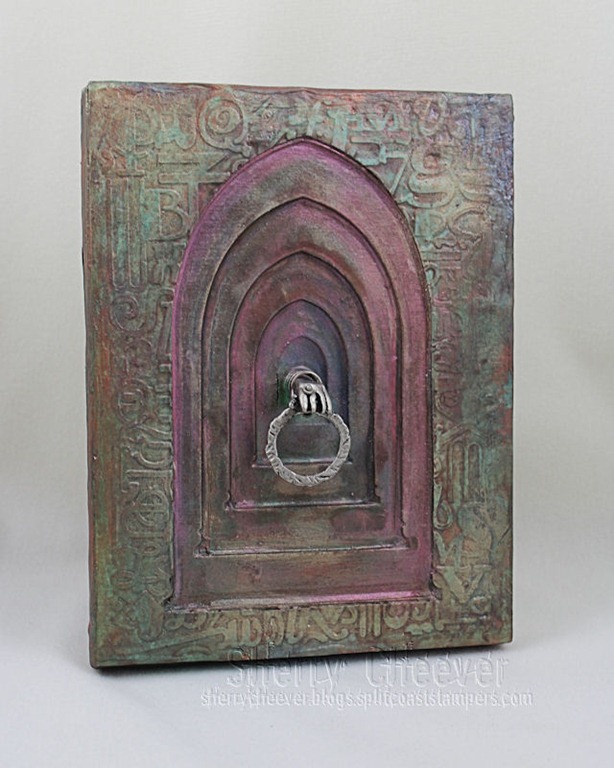
I had such fun working on my projects for the Sneak Peek and thoroughly enjoyed stepping outside my box to work with mixed media on altered projects. For both of my projects I used beeswax . . . way too much fun.
Project Supply List:
- S5-178 Arched Windows One
EL-027 Numbers and Letters M-Bossabilities
LF-132 Grand Rectangles
Grand Calibur
All new products shown in the Sneak Peek can be found in the “What’s New” section of the Spellbinders Online Store!
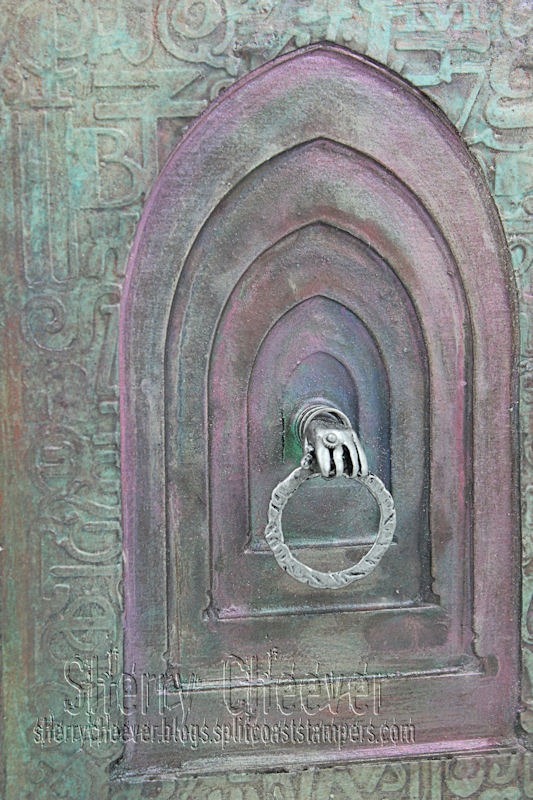
My first project is constructed completely from chipboard and covered in beeswax and Perfect Pearls.

During a shopping trip at Michael’s, I found that fabulous dangle hand charm from Industrial Chic by Susan Lenart Kazmar.
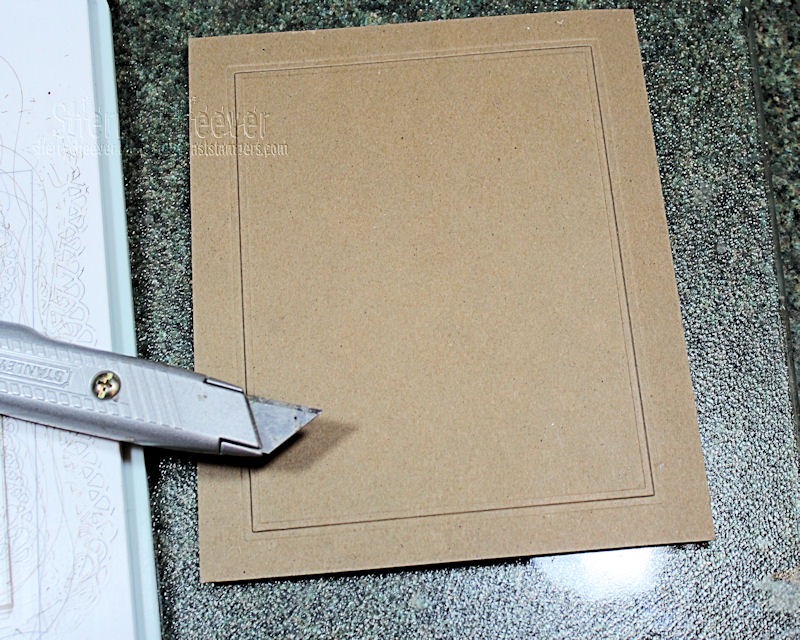
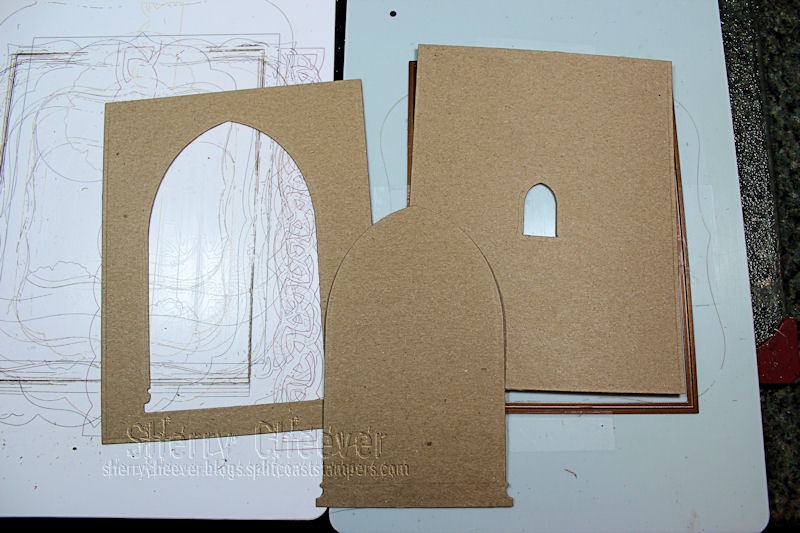
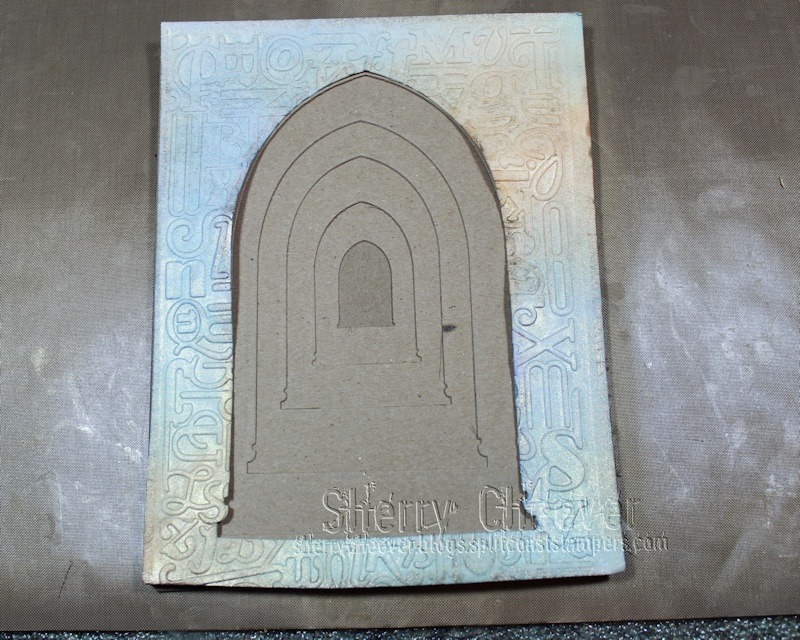
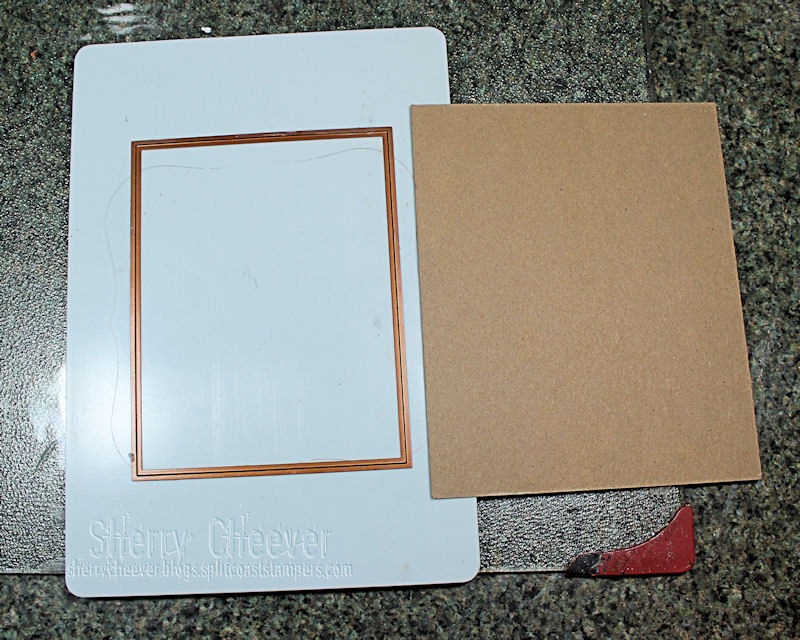
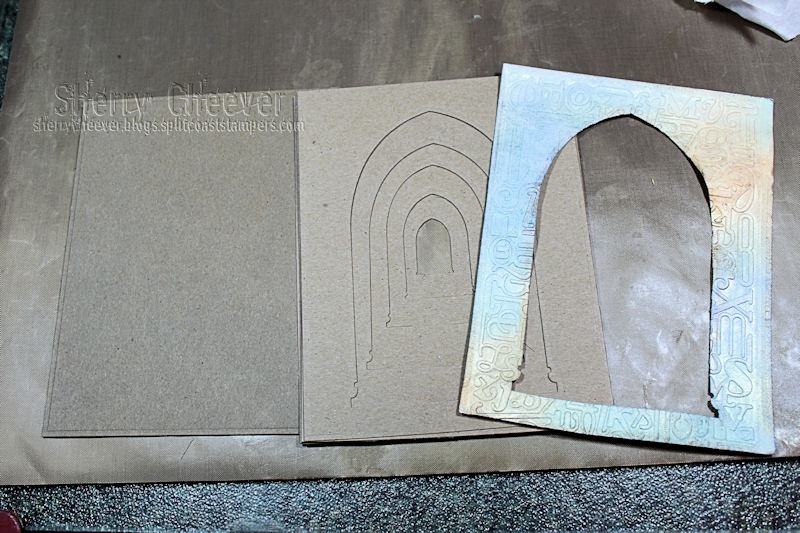
My project was created using .22 thin chipboard – three pieces die cut and glued together for each recessed layer. For the purposes of the tutorial, I will only be using 1 piece. If you wish to try your hand at this project, to get the depth I created, you will need to die cut 3 individual pieces and glue them together to make one layer. Spellbinders die templates very easily cut .22 thin chipboard; however, medium weight and thicker requires a little more effort. I say this because the backing to the piece is actually medium weight chipboard that I die cut with LF-132 Grand Rectangles Nestabilities®.

As you can see, the die does not cut all the way through the medium weight chipboard; however, you do get a very detailed cut that you can complete with a simple mat knife or cutting blade.
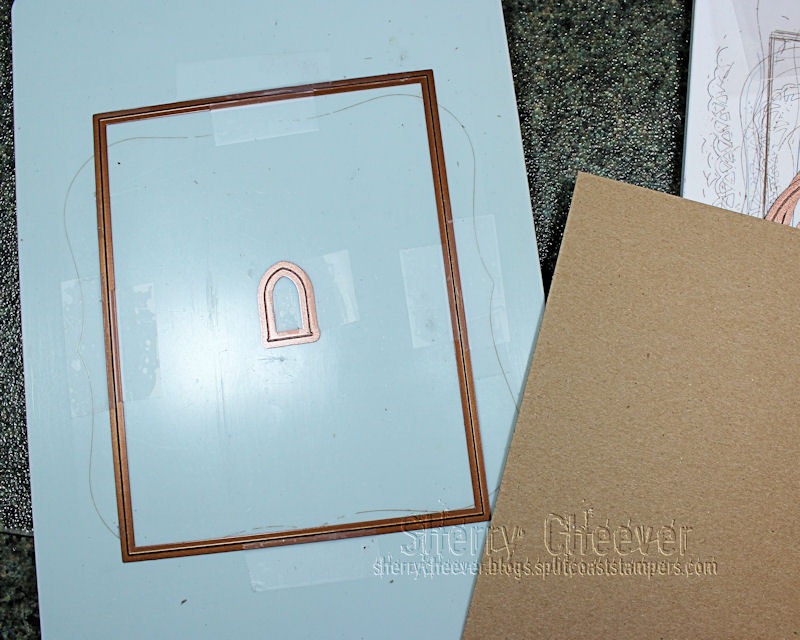
To align the dies for the different layers, the Grand Rectangle was taped in place. I recommend taping all four sides, inside and outside, to keep the die from slipping with repetitive cuts. All five dies from S5-178 Arched Windows One were placed inside the Grand Rectangle, centering them as you want.
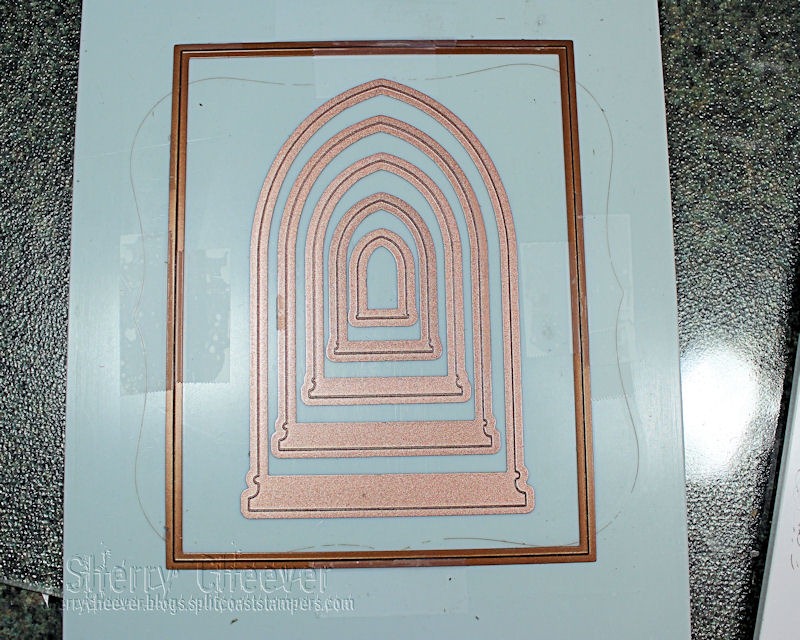
Once the placement of the smallest die has been determined, tape the die in place as you did the Grand Rectangle.

You can now die cut the thin chipboard. Remember that I’m only showing your one piece of chipboard. For my project, I die cut the same die arrangement three separate times. All three pieces were then glued together to form one layer.
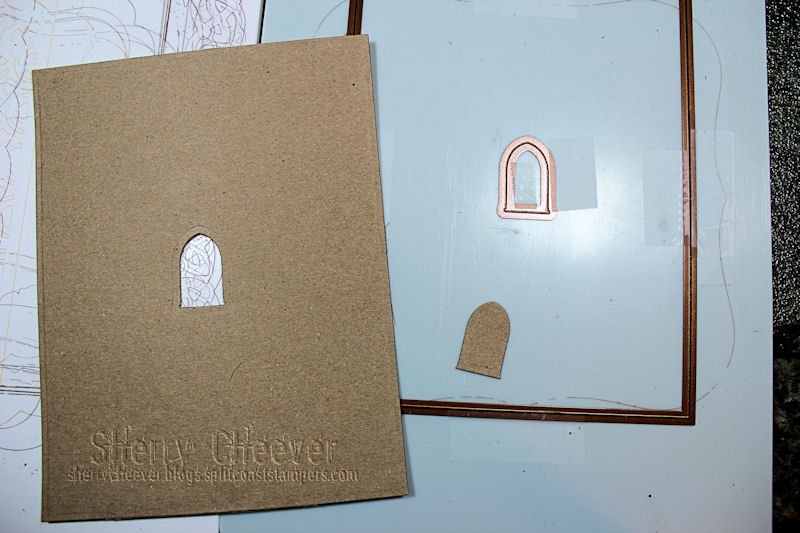
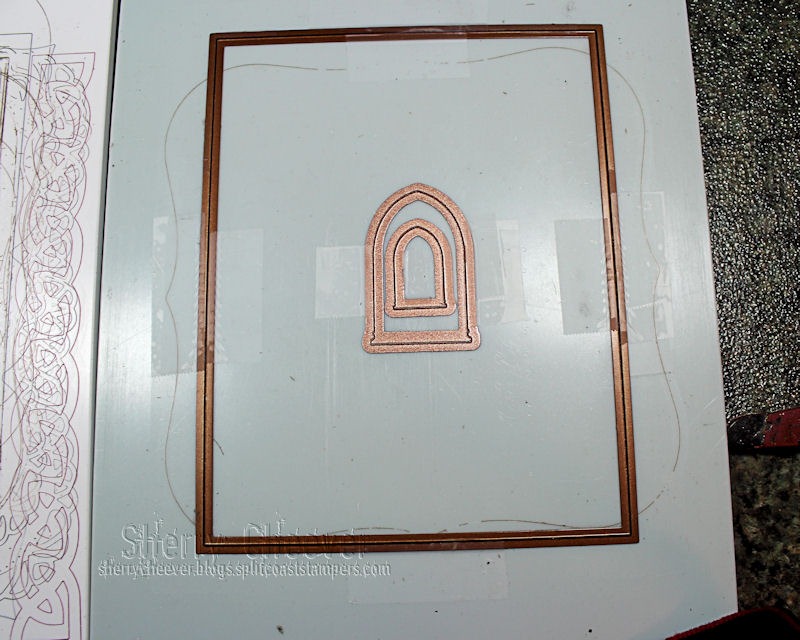
The next larger die was placed around the smallest, for the next layer to be die cut.

You will continue in the same manner as described above until you have cut all the different layers.

Here you can see the difference from the largest to the smallest die template. I also saved all the Arched Window die cuts to use on another project.
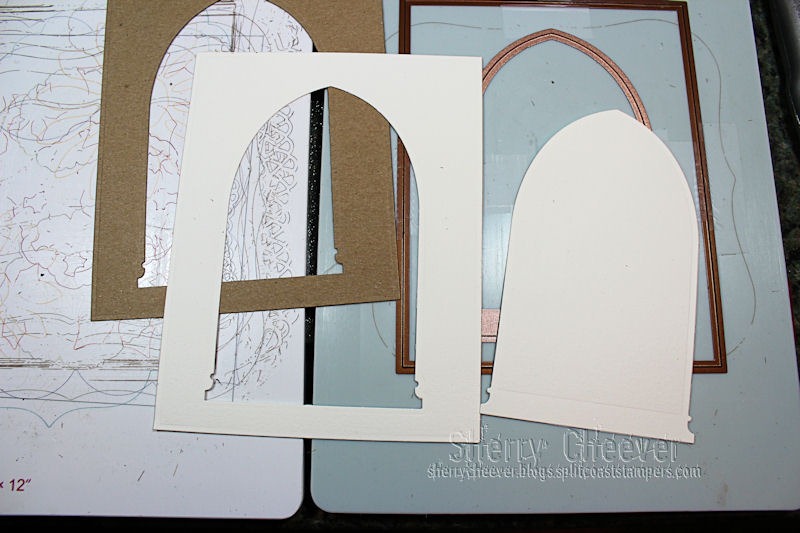
While the largest Arched Window die is still placed within the Grand Rectangle, I die cut a piece of watercolor paper to be used as the top layer of the project.

The die cut watercolor paper was then misted with water to open the fibers of the watercolor paper . . .
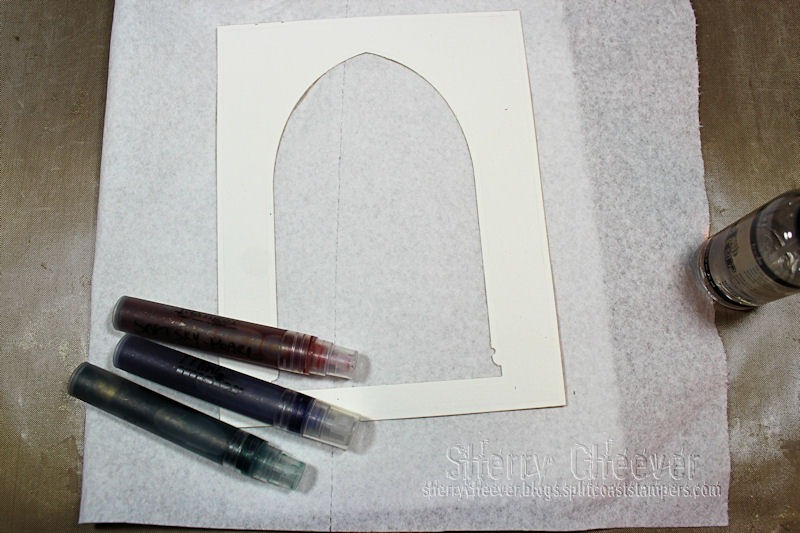
and then misted with a combination of Perfect Pearl sprays that I had previously mixed up. You can use any type of ink that you want to color the paper with.
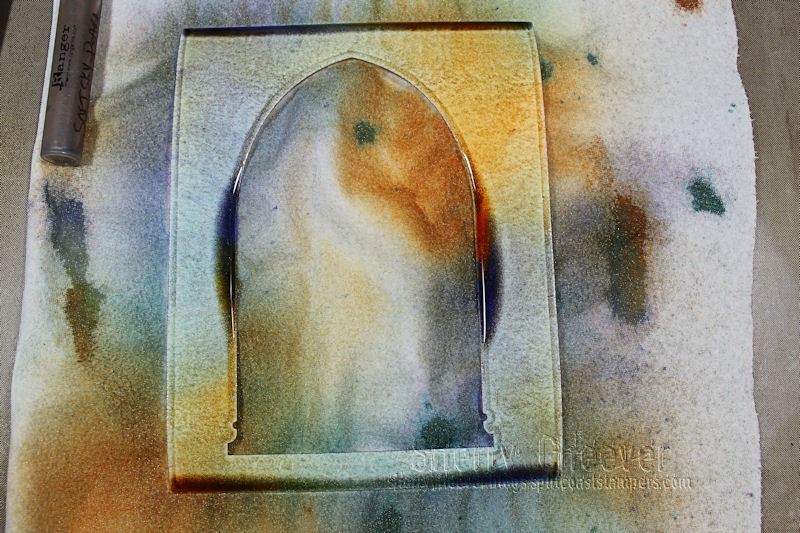
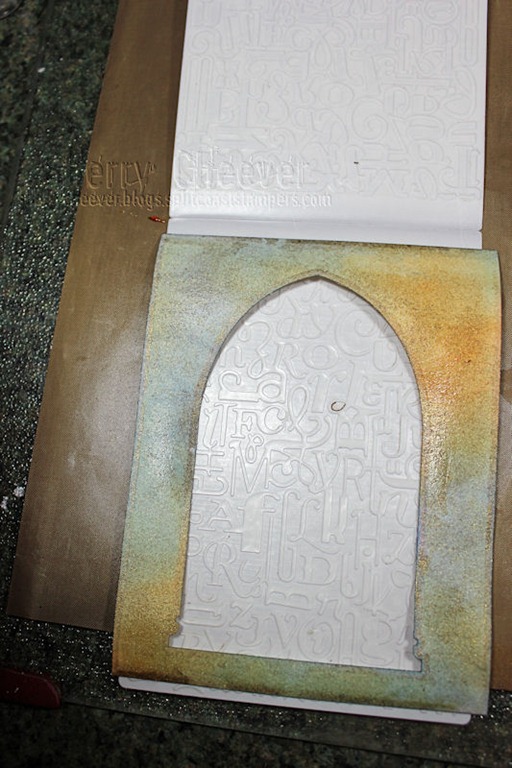
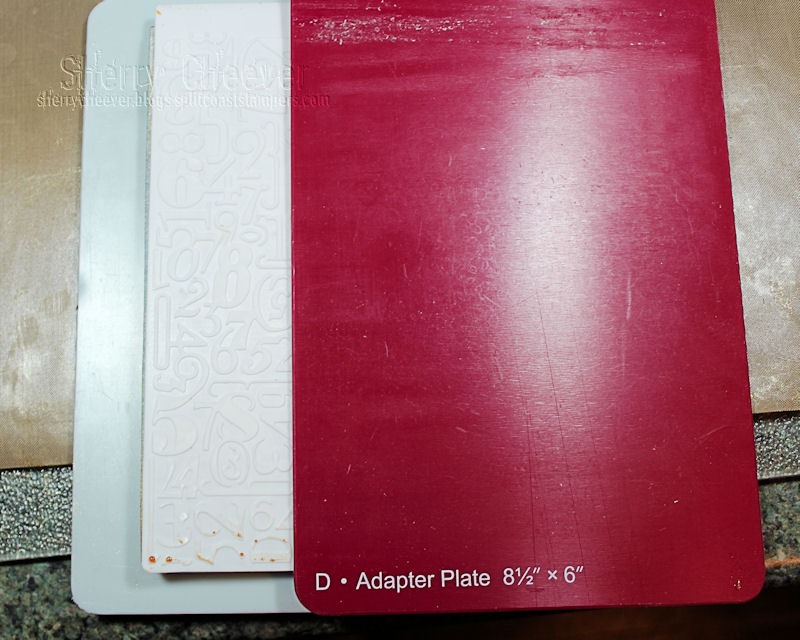
I like to use mists because while the watercolor paper is still damp, a deeper embossing is achieved. Here I’ve placed the still damp watercolor paper in the EL-027 Numbers and Letters M-Bossabilities.

The sandwich for using M-Bossabilities is the Base Plate, M-Bossabilities with paper inserted, and then the Adapter Plate.

This is the watercolor paper once it has been embossed.
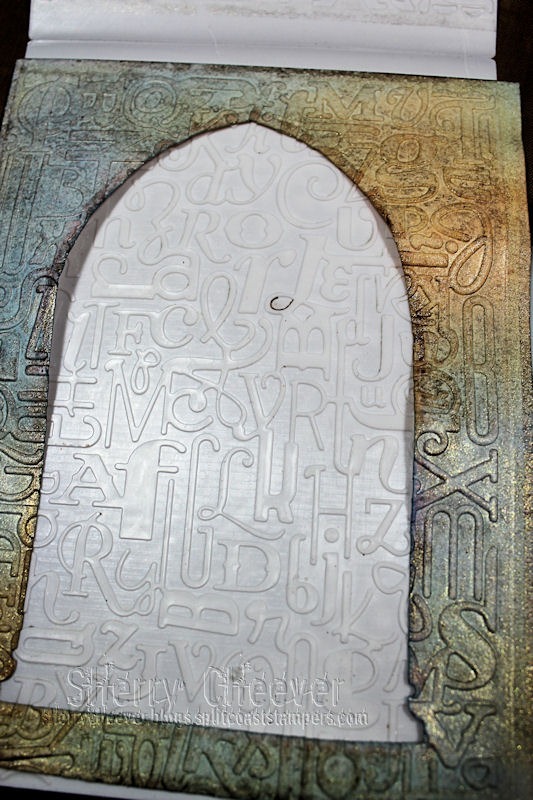
Here are all the different layers for the project. Each layer, except the watercolor paper, can now be glued together

To adhere the watercolor paper to the chipboard, I layered down three or 4 layers of beeswax before applying the watercolor paper.
The remainder of the project was completed by adding layers of beeswax and different colors of Perfect Pearls.
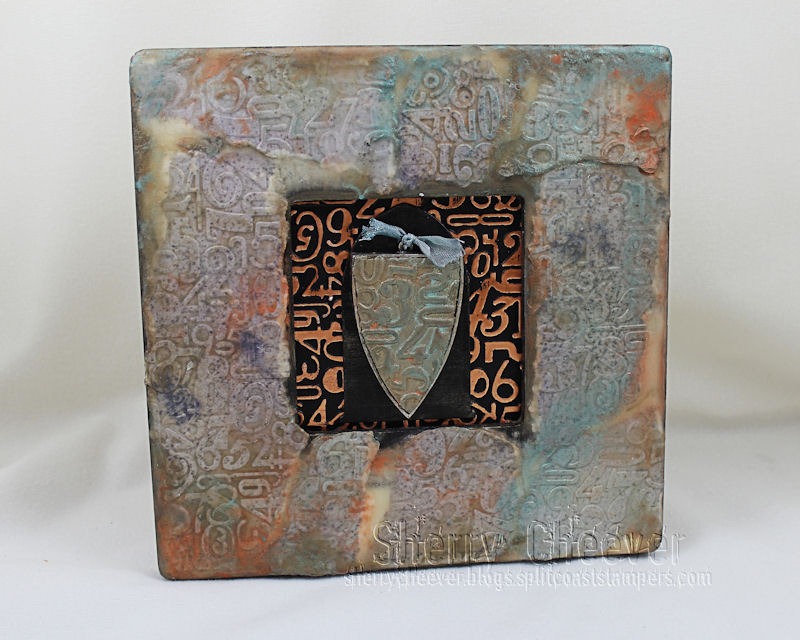
For my second project, I altered a $ frame from Michaels with beeswax. I’ll give you more details on this project in a few days.
Official Giveaway Rules can be found HERE.
Enter the Giveaway HERE!
Questions? [email protected]
No entries will be accepted at this email address.
Thanks for stopping by today and don’t forget to visit Candy Rosenberg’s blog today for another chance to win and more inspiration.
![]()


I totally adore this project Sherry, stunning!! The tutorial is very clear too, thanks for that!! The end effect is fabulous! The frame looks very cool too!
Beautiful Project.. FAB use of the dies.. and lovely Emboosing.. Love the 3D look of it.. and It looks like the door to Heaven.. :o) Great Shine and glam with the Perfect Pearls.. Looks Great! :o)
Fabulous!
Such an awesome project here too Sherry. I love the way you used and layered the dies here on the first project, it gives a really nice look and the docoration is gorgeous. Great work here thanks sooo much for the inspiration and a great tutorial here.
You creations are fabulous! i just can’t wait to get my hands on all the new things we have been so spoilt!
these are fantastic, I love the first one, so much inspiration here, thanks!!!
Lovely projects the arch window is now on my growing wish list too!
Oh my gosh, Sherry!!! This is beyond wonderful!! Wow!!!
I love the technique you used in this project. I am definitely going to try that, it’s beautiful. That die is fabulous as well and it’s definite on my list. This is one of the best releases ever. 🙂
Thank you or sharing,
Sara Tanner
eyes2theocean
Careful there girl, your creativity is showing! This piece is wonderful and I love everything about it!
Wonderful project! I love how you used so many different techniques…and the tutorial is very clear. Thanks for the inspiration – I have never used beeswax on a canvas but I want to give it a try now. It looks amazing!
Love this, Sherry! Amazing project and I’m crazy over that embossing folder…love it, going on my wish list! 🙂
WOWERS this is a great tutorial with fabulous results! Love those new dies!
Hugs, Cathy-Lynn
Really cool project, Sherry!
Love the project and am “impressed” with the embossing folder you used; you never cease to amaze with your creative ideas. I probably would have used the folder for making birthday cards…lol! Thanks again for your inspiration, Sherry!
You’ve inspired me to “explore beyond” — would have never dared to try beeswax, but now I think I just must!!! Amazing design work — TFS!!!
WOW! I love working with Perfect Pearls but never thought to try them with beeswax..fabulous!
Knock, knock who’s there? It’s Sherry is a wow project, I love it and it has blown me away with all the steps. Great job my friend.
LOVE the colors and textures!
Oh Sherry! This is WONDERFUL! Your work is always so lovely! Such a treat to have you back in the seat of Creativity! Thank you for all the inspiration!
beautiful piece of art. ove the layers and the colors of misting.
Have a great day
WOW! Amazing projects. I like that we are getting the directions on to duplicate these projects. I love the misting you did and the way it looks metallic. I can’t wait to see how you did the second project.
Great projects! I LOVE how you did that receding door, gorgeous!
I have no idea how to work with beeswax…would love a tutorial, oh great one!
The texture( and shine and dimension) on this piece is absolutely fabulous. I love it!
What amazing projects!! I love the misting and embossing!! Absolutely gorgeous!! Thanks for the inspiration 🙂
Both projects are so interesting and fabulous!!
Great projects Thank you for the very good tutorial
wow, that is a really cool project. Really easy directions too. I am in awe!
What wonderful projects, Sherry!! I will have to give Bees Wax a try!!
WOW!!! Amazing. I can’t wait to see how you achieved the texture on the $ frame! My creative brain is reeling…I need beeswax 🙂
Fabulous projects, Sherry.
Wow – these are amazing! Love the layers and beeswax!! Thanks for the inspiration!
Sherry, what an awesome job you did. I love it. Thanks for sharing.
WOW Sherry….your 2 projects are beautiful!!!!! Looking forward to your ‘How To’ posting!!!
Paper Hugs,
Jan
LOVE this die. i have been begging for a gothic arch since Spellbinders first came out with Nestabilites. loverly project, can’t wait to buy these.
Love your project Sherry – thanks for the detailed tutorial – the end product is awesome. Looking forward to seeing how you did the frame too. tfs
Hugs
Heather (UK)
x
Sherry what great projects… I LOVE the color scheme of your arches… You did a great job!
Awesome Ideas, The colors are great.
love all the new ideas I have gathered during this new release!
Very Pretty, Sherry…The colors and textures look JUST like embossed clay! Nice!!!
Great projects! I LOVE how you did that receding door, gorgeous!
Greetings from the netherlands
http://antoinettecreacards.blogspot.nl
Absolutely stunning projects!
What beautiful layers!! And the colors are yummy 🙂
Great project, Sherry. Love how you created the background and your beautiful mix of colors!
What amazing projects! Love them both!
Very beautiful! Love the colors you used.
Wow, I love the “never ending door’ look/idea! And the way you created and colored it in, looks amazing! I need to give that a try sometime! I’ve never worked with beeswax before but I want to, thank s to you! 🙂
Really cool stuff, Sherry! Thanks for the inspiration.
The colors are sooooo pretty! You are very creative, I don’t get any further than a card with a cutestamp….
Warmest greetings, Renata
What a neat project! I love the way you have altered the chipboard and misted your watercolors – really pretty!
Hugs, antonella 🙂
Truely amazing projects. Great tutorial. Thank you for sharing. Hugs, Velma
Sherry, what an amazing project. It’s beautiful. Can you give us some real elementary instructions on the use of the bees was, and why you use it. What does it do for the project. Maybe when you give the details about the frame project. Thanks a bunch.
nicely done!
Sandra ltb
Today must have been what I love day. First Altered art and then mixing it up with a lil mixed media. My two favorites. Wonderful ideas and lovely projects. Thanks for the inspiration.
WOWZERS! These are absolutely Amazing! I especially love the one that looks like an Italian door or window!
What fun dies, love what you did with them!
That is so beautiful, I love the arch dies too.
That’s gorgeous!
What fabulous new products.
I love the effect you have achieved by layering perfect pearls and beeswax. Just wonderful, thanks for the inspiration. Maddy x
Very cool projects. Thanks for the wonderful tutorial. Very nice, indeed!
Those are GORGEOUS! Thanx so much for the tutorials! I am so glad that Spellbinders will have and Arched window die as I have been searching for one.
Hi Sweet Sheri,
It has been quite a while. Have had a lot of family problems, and a very busy holiday season. Things have finally calmed down and I am back to blogging finally. Saw your sweet granddaughter Sherry, she is absolutely adorable!!!!!!! Congrats. I know how much you are enjoying her. Loved this project Sherry, and am absolutely in love with this new release. My wish list is very long (as always). Hope to do some catching up and talk to you soon.
Hugs,
Marcie
I love the arched widow dies and what you have done with them your projects are gorgeous and great instructions. Thank you for sharing with us.
Fiona from Scotland
Beautiful work
Wow! This is super creative!
Cute projects, especially the 1st one-very creative. Thanks for sharing
very cool, love the layering and the beeswax is such a cool touch
what a fab way to use these dies – certainly inspiration for me.
Wow, totally inspirational!
Wow! Outstanding works of art!
Wow…super pretty projects! I’ve not had a lot of experience with mixed media, but after looking at the last few days projects…gonna definitely have to try it!!
superb projects…can’t wait to look into this mixed media art!
Thanks for the tutorial for this amazing project Sherry. The layering is beautiful and I love the arched window dies…. Hugs xx
Beautiful and creative projects. Love the use of the bees wax too. The new dies are wonderful.
What a great project, although I wouldn’t have thought of it with just the charm! You’ve got a very creative mind!
All i can say is WOW! Thanks for inspiring me to create!
What great projects! I am really looking forward to your next tutorial. So many great techniques and tips. Thanks!!
love it, thanks for sharing and the tutorial pics.
Beautiful projects you shared. Those colors are so dreamy. I’ve been blown away by all the things you can do with Spellbinders. Thanks for sharing.
Thanks for sharing. Looks a little complicated for me to try.
Thanks for sharing this amazing dimensional project and your frame Sherry. You are so creative!
Fabulous projects. Thank you for sharing.
Loving what you created here Sherry. Creative and clever! I would love to see this in person.
Fantastic projects, Sherry and you really make me want to see more!!
Fabulous projects! Your tutorials are awesome and love all the inspiration! TFS! Beautiful!
Sherrie K
http://sherriescraps.blogspot.com
What a beautiful finished project; I too love Perfect Pearls. Love your tutorials. Thanks for sharing
Great project, thanks for the tutorial!
This is a very beautiful project. I love it.
The look and feel of stone that you have created is awesome.
Amazing work with the cardboard! great altered projects!
Sherry, your projects are always amazing works of art! I really love the awesome shape if this new window die!
thanks for all the inspiration!
hugs
Judy
gorgeous project and great tutorial, love the depth on it.
Really like these projects – the shimmer of the perfect pearls is so pretty. Love the texture too!
I’ve had the opportunity to play with beeswax altered art – such fun!!!
This is a very Beautiful Project!! Love it!! WOW…can’t wait to get some of these dies into my little hands!! TFS!!!
Rexann ♥
Beautiful!!!
wow, your arch is gorgeous!! LOVE all the details and techniques and that beautiful die!
Outstanding. You definitely brought the color with the aged feeling.