
 Good Monday morning! I hope y’all had a fabulous weekend. I know I did – – – Didn’t get out of my pj’s and spent many hours in the studio . . . it was marvelous! Tonight is my first class at Lavender Sentiments and I’m super excited. Hopefully it will go well and I’ll have a few more in the upcoming months.
I’m just about done with T!m’s  12 Tags of Christmas. I’ve had so much fun creating and working on these tags. It’s been a great way to get the old mojo going! Today I have Tag 11 for you. Here’s T!m’s Tag 11 and mine is below. I decided to go with a softer look on this tag and I must say that I’m totally pleased with this one!
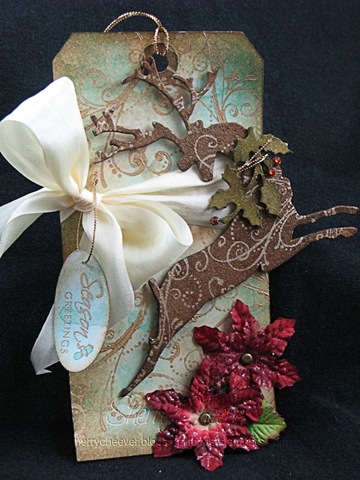
The background was made with the Wrinkle-Free Distress Technique, using Broken China and Vintage Photo Distress Inks. After the background dried, it was misted with Gold Perfect Pearls and water. The reindeer is Grunge Board that I misted with Gold/Vintage Photo Pearlized Distress Mist and let it soak into the Grunge Board. The holly was done the same way and the berries are Taylor’s Tiny Twinkles from Taylored Expressions, adhered with a bit of Fired Brick Distress Stickles. The silk flowers were covered with Rock Candy and Fired Brick Distress Stickles. For added interested I stamped the reindeer and the background in gold acrylic paint with flourishes.
- Stamps: Priceless from SU; Holiday Script from Lizzie Anne Designs
- Paper: Manila Shipping Tag; Mini White Tag
- Ink: Ranger Vintage Photo, Peeled Paint, Broken China, and Embossing Distress
- Accessories: Ranger Mini Misters, Non-Stick Craft Sheet, Gold Acrylic Paint Dabber, Gold Perfect Pearls, Rock Candy and Fired Brick Distress Stickles, Queens Gold Embossing Powder, Inkssentials Ink Blending Tool; Tim Holtz idea-ology Long Fasteners, Plain Seasonal Grunge Board; May Arts Ribbon; Gold Cord; Silk Flowers; Foam Mounting Tape, Taylor’s Tiny Twinkles
Well, I’m off to get ready for tonight’s class and to work some more on the special projects I’ve got going. Thanks for stopping in and spending some time with me on the BAD Side today . . . Have a fabulous day!


