Good Friday morning!  When you are reading this, I’ll be at the doctor with Mallory hoping that we finally found out what is wrong with her.  Bless her little heart . . . she just hasn’t felt well for so long and I hope we get some answers today.

In answer to a few questions yesterday, YES we were able to find out the grandbaby’s sex, but I am sworn to secrecy!  There are a few men in the family who don’t want to know . . . . so we women have to remain silent and keep all our purchases hidden until the big day . . . which is, according to her due date, October 26.  We get to add one more October baby to the family . . . that will make my aunt, me, Mallory and baby!

Did I tell you how much I LOVE The Queen’s Ink!  The store is fabulous and so much fun to shop.  Well YES I had to fill a basket!  I found a few new stamps while I was browsing around, and I used one of them for today’s card.

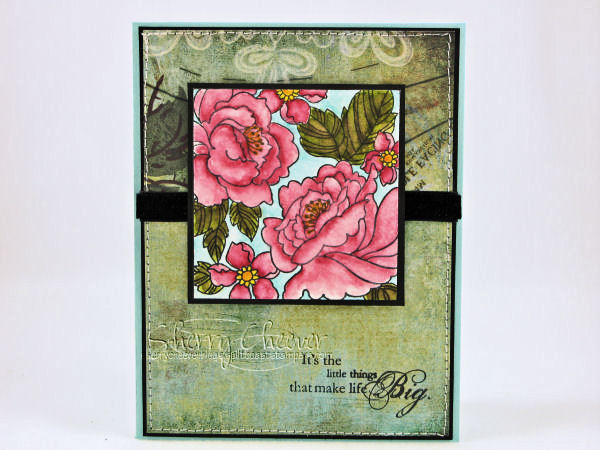
Now this card is all about techniques.  As you can tell, I’ve not grown tired of the Faux Batik yet . . . you might have, but I haven’t and I’m still playing.  Actually when I saw this background stamp (Garden Background from Stampendous) that was the first thing that came to mind . . . Faux Batik.

gardenbackground

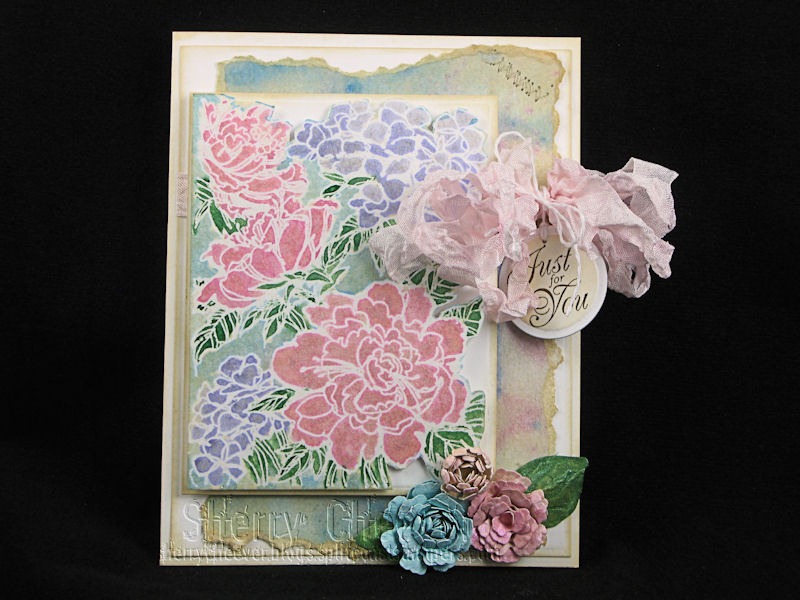
The image, the paper, the flowers and the ribbon were all colored with Twinkling H2Os.  It’s been a very long time since I’ve pulled them off the shelf, so I thought – – why not?  We are playing with techniques and all!  Of course, the image was embossed in clear and then when dry the embossing was ironed away (Faux Bleach/Batik Technique).  Colors of Twinks used were Apple Blossom, Fern, Sweet Lavender, and Caribbean Mist.

For the background (and because I couldn’t find just the right paper) I made my own by misting a piece of mixed media paper with water and then dumping some water from the Twinkling H2O cups.  The paper was misted again and then dried with a heat tool.

gardenbackgroundCLOSEUP1

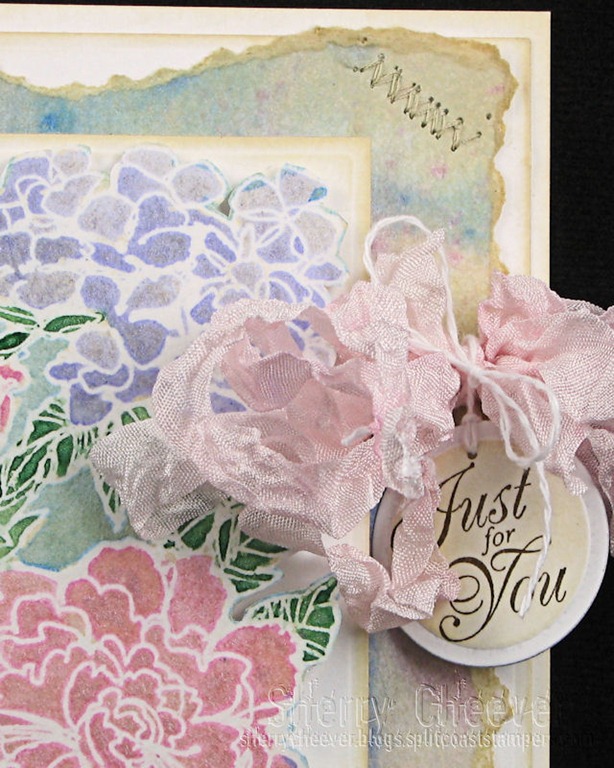
You can barely make out some of the shimmer of the Twinks on the papers.  The seam binding was dyed by misting the pot with water then dumping it out on the craft sheet and misting the color with more water.  They actually worked better than I thought.

gardenbackgroundCLOSEUP2

Before the flowers were die cut, the paper was painted with the same Twinks.  Can you see the shimmer on the leaves?

This is the image after it was initially water colored:

FAUX BATIK FLOWERS

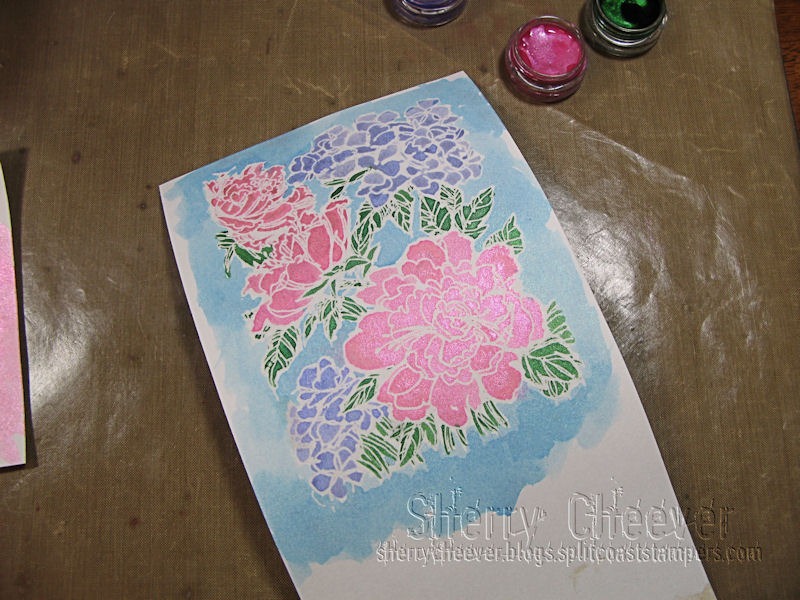
Pretty bright for me, so I added a light sponging of Antique Linen Distress Ink over the top to town it down a bit.

That’s all for now.  Thanks for stopping by today and remember to enjoy the adventures that come your way!

SHERRY SIGNATURE

Project Supplies:

Oh my BADness, it’s Friday! I can hardly believe the weekend is here already. I spent yesterday afternoon reorganizing my work space, and moving things around. Now I have to tackle the stamps. Speaking of stamps, I’ve had some fun recently going through my old stamps and finding things I had long forgotten.

Today’s Limited Supply Challenge on Splitcoast actually fell in my lap today! It’s called Oldies But Goodies, and the challenge is to use old stamps that you won’t get rid of, but haven’t used in a while. One of the other things about this challenge is to use some old designer paper or cardstock that you have been hoarding. I actually use my designer paper so what I decided to do were use items to stamp my own background that I never use anymore. They also asked us not to use Copics, but to dust off other coloring tools.

LSC182

I stamped the image on watercolor paper and then painted with Ranger Distress Reinkers. To add just a bit of bling to the image, I painted on some Stickles and then shook on a bit of glitter (which I never use anymore). For the background, I stamped the sentiment in embossing ink and then embossed with Holographic EP (another item I don’t use anymore).

  • Stamps: Witches Feet from Stampendous; Trick or Treat Sentiment from Custer’s Last Stamp
  • Paper: Canson Watercolor Paper; SU Basic Black and Kiwi Kiss; Prism Majestic Purple Dark
  • Ink: Ranger Archival Jet Black; Distress Embossing; Spiced Marmalade, Black Soot, Weathered Wood, Peeled Paint and Dusty Concord Distress Reinkers
  • Accessories: Ranger Crystal Stickles; Diamond Gold Ultra Fine Glitter; Holographic EP; Brads; Ribbon; Venture Foam Tape; Watercolor Brush and Cup of Water

I’m heading back to the studio to work some more. I started a few cards last night that I would love to finish up today. Have a good one!

Happy Tuesday! Boy it seems like the days are just flying by and I’m spinning more and more. It’s been a busy morning around here today and the more I do, the more behind I get! Hate days like this one, and I just found out I have a project deadline to meet in the next day. So once this post is complete, I’m hiding in the studio for a day or two.

I’ve been thinking some about the challenges on Splitcoast, and have decided that I need to try and complete them every day if possible. A few years ago when I first started doing the challenges, I was new to Splitcoast. The daily challenges were the first things I stumbled upon in the forums and got hooked immediately. I participated each and every day, learned new techniques and improved my stamping because of the challenges. If you look back, it’s hard to pick out a Dirty Dozen member that has not participated in the daily challenges. I feel I owe so much to Splitcoast and the challenges, and want to support the challenge hostesses in any way I can. The best way I know to do that, is to participate.

So, in my quest to participate as much as possible, today’s challenge is the Color Challenge. Emily picked some awesome colors today (Soft Sky, Wild Wasabi and Ruby Red) that just scream holidays. While I was in Texas, I picked up the Witch Shoes by Stampendous, knowing that there were so many possibilities with this stamp. I had been looking at it online for a few months, and when I saw it on the shelf – well that stamp just fell in my basket.

CC139

I stamped the image on watercolor paper in Black Stazon and water colored with reinkers. There are a few Stickles on the dresses to add a tiny little bit of bling too. The background paper is from the BasicGrey Dasher Collection that you can find here. I sewed the background panels together using my sewing machine (which I must give a nickname), and finished off with a little bit of ribbon. This was such a fun card to make today and I hope you see the humor in it – Holidays/Hollies. BWAHAHAHAHAHA! (Okay, so the thought just hit me, Holiday Hos – should have stamped Ho Ho Ho instead of Happy Holidays).

Stamps: Witch Shoes by Stampendous, SU Warmest Regards

Paper: Watercolor, SU Soft Sky and Ruby Red, BasicGrey Dasher Collection

Ink: Black Stazon, SU Ruby Red, Soft Sky and Wild Wasabi

Accessories: Reinkers, Sewing Machine, Watercolor Brushes, Mounting Tape, Ribbon, Crystal Stickles

Because of the crash on Splitcoast, I’ve lost the last 2 posts I made. Now I do have the description for the Peony Square, but the one about the cupcakes (which I thought was one of my better revelations) I don’t have. I’m going to repost them both here starting with the cupcake card. Sorry for the repeat, but just trying to catch up!

Cupcakes

Now for the Peony Square, in it’s entirety:

Well, it’s Friday and another week has passed. This morning I’m up early and out but I wanted to have some stamping for you. I actually did this card over last weekend, and decided to hold it for a day when I couldn’t stamp. And that be today!

Because of Jenn Balcer’s great inspiration, I just had to get the Stampendous Peony Square from eclectic Paperie. I love peonies, but do not have the necessary sun to grow them. However, I do admire all the ones in my neighbors’ yards while I drive down the road.

The image was stamped in Black Stazon on watercolor paper. I then water colored the image (which took me way too many hours) with reinkers and markers. Now if you haven’t tried them, I am really lovin’ these Tsukineko fantastix coloring tools that I got from eclectic Paperie. They can be used with chalking, bleaching, blending, etc., and are so easy to use. I knew while coloring the image that I wanted to use Cool Caribbean as my card base but didn’t know about the background. Once I had the image colored, I loved the brightness of it so much, that I picked a soft muted DP from BasicGrey Stella Ruby. The sentiment is from Happy Harmony and is stamped on the DP in Black Stazon. I stitched the sides of the DP to the black background layer and then used a piece of black velvet ribbon (that I got in one of Jody Morrow’s great ribbon shares). All products unless noted are from Stampin’ UP!

Poppy

Stamps: Stampendous Peony Square from eclectic Paperie, Happy Harmony

Ink: Black Stazon, Pretty in Pink, Pixie Pink, Rose Red, Cool Caribbean, Summer Sun, Marigold Morning, Old Olive, True Thyme

Paper: Watercolor, Basic Black, Cool Caribbean, Stella Ruby by BasicGrey

Accessories: Markers, Ribbon, Mounting Tape, Sewing Machine, Tsukineko Fantastix Coloring Tool

© 2015 Suffusion theme by Sayontan Sinha